About the Feature
Adjusting / Updating the quantity of a product can be done for each product one by one at product level or using Inventory Adjustment feature or in bulk by uploading a CSV fileproducts in inventory.
The following steps are explained as per Odoo 10 available on Bahmni 0.92 release.
Used By
This feature is used by Pharmacist/Hospital Admin.
How is it Used?
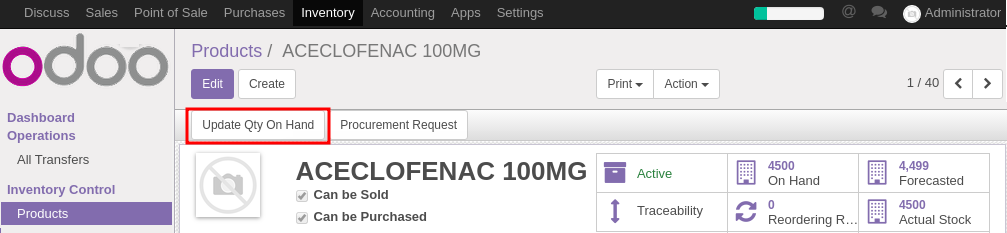
1. Updating the product quantity on hand at product level
Click on the “Inventory” menu appearing in the navigation menu at the top of the screen.
Click on the “Products” option in the left panel appearing under the “Inventory Control” section, which will be listing all the products.
Search the desired product by entering the product name in the search field appearing at the top right of the screen.
Click on the searched product record and view various details of the respective product.
Click on the “Update Qty On Hand” button appearing at the top left side of the screen, which will open “Update Product Quantity” popup.

Select the desired “Location”, “New Quantity on Hand” & “Lot/Serial Number”, in which you want to update the quantity, in respective fields.
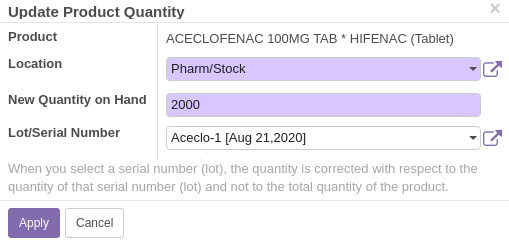
You can also create a new lot/serial number from here by selecting the “Create and Edit” option in the “Lot/Serial Number” field.
Click on the “Apply” button to apply the given quantity update details.
2. Adjusting the quantity of products
one-by-oneusing “Inventory Adjustments”
Under the “Inventory” module, go to the “Inventory Adjustments” option in the left panel from “Inventory Control” section.
Click on the “Create” button appearing at the top left side of the screen.
Enter the “Inventory Reference”(For example March 2020 Stock from St.John’s Hospital) and select the desired “Inventory Location”, where you want to make the adjustments, in respective fields.
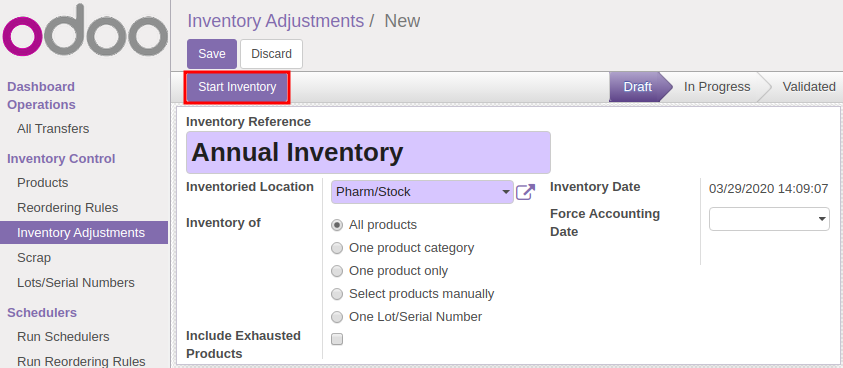
Now accordingly select the desired “Inventory of” option-
Select “All products” option, if you want to adjust all the products in selected inventory.
Select “One Product Category” option, if you want to adjust products of a particular category and then select the respective category in “Inventoried Category”.
Select “One Product Only” option, if you want to adjust a particular product and then select the respective product in “Inventoried Product”.
Select “Select products manually” option, if you want to adjust the products of your choice selecting them manually after starting the Inventory.
Select “One Lot/Serial Manually” option, if you want to adjust the products of your choice selecting them manually after starting the Inventory.
Click on the “Start Inventory” button appearing at the top left side of the screen.
Verify and update the adjustment details in the “Inventory Details” grid according to the selected “Inventory of” option.
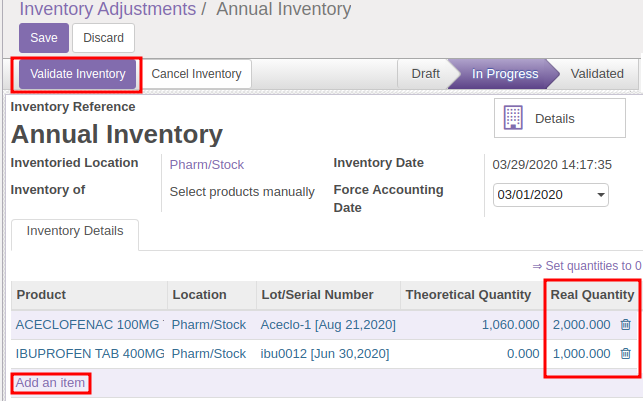
You can also create a new batch and update the quantity for the desired item by clicking in the “Lot/Serial Number” field under the grid and choosing the “Create and Edit” option.
Click on the “Validate Inventory” button to apply the adjusted inventory.
3. Inventory Adjustment in bulk using CSV file upload
To adjust the inventory using file upload, first create a csv file with respective details as shown below. Refer attached file (Adjustment Upload Sample.csv) for better understanding.

Click on the “Import” button appearing at the top left corner of the “Inventory Adjustments“ screen and load the csv file.
Click on the “Validate” button and then on the “Import” button, if everything seems valid.
Once imported, a new record will appear in the grid with given Inventory Reference & “Draft” status.
Click on the respective record, which will open the details of the imported records.
Click on the “Start Inventory” button appearing at the top left side of the screen, which will bring the product details grid listing all the products added in the imported sheet.
After verifying the details click on the “Validate Inventory” button and the adjustment will be done successfully.
| View file | ||
|---|---|---|
|
| Table of Contents |
|---|
| Info |
|---|
Feature Details |
| Info |
|---|
Implementation Details Implementer's Guide - Odoo Modules - Odoo Inventory Configuration |