Purpose and Benefits
The Registration module allows a patient's information to be captured and maintained. It also acts as a starting point for the patient through the medical facility's workflow. It supports a flexible configuration of patient attributes to suit several types of implementations. The patient's address hierarchy, patient relationships, visit details and death reasons can also be configured.
| Tip |
|---|
You can also watch this Youtube Playlist which shows how to configure the registration screens in Bahmni: Registration Configuration Playlist |
Steps
1. Configure Core Fields
Certain core fields such as name, gender and age come out of the box with Bahmni and do not need to be set up. However, the Patient Identifier needs to be setup.
Setup Patient Identifier
Bahmni comes pre-installed with the OpenMRS idgen module and a patient identifier type called "Bahmni Id". In order to modify the dropdown for ids, identifier sources for the Bahmni Id need to be edited. Here are the steps to edit the identifier sources for Bahmni.
Configure Patient Identifier:
In Bahmni, patient identifiers are configurable. The default patient identifier prefix can be configured on the Registration page.
Add or Edit a Patient Identifier
To add a new patient identifier or edit an existing one, please refer to this document: Patient Identifier
Display the Default Identifier Prefix for Primary Identifier Type
On the Patient Registration page if you want to display a default identifier prefix for primary identifier type , please add the following configuration under config section in the registration/app.json file.
| Code Block | ||||
|---|---|---|---|---|
| ||||
"defaultIdentifierPrefix”:source name of identifier/prefix |
| Code Block | ||||
|---|---|---|---|---|
| ||||
“config”:{
  "defaultIdentifierPrefix”:”GAN”
} |
If the default identifier prefix is not provided, or if it is empty or invalid, Bahmni will pick the first patient identifier prefix after sorting the available identifier prefixes in alphabetical order, as the default identifier prefix.
Note: this configurations works only for the primary identifier type, not for the extra identifier types.
Make extra identifiers read only in registration page:
On the Patient Registration page if you want to make extra Identifier fields non-editable, please add the following configuration under config section in the registration/app.json file. And specify the extra Identifiers that needs to be non-editable, for example ("National Id") in below config. By default extra Identifier fields are editable.
| Code Block | ||||
|---|---|---|---|---|
| ||||
“config”:{
  "readOnlyExtraIdentifiers": ["National ID"]
} |
Note: This configurations works only for the extra identifier types, not for the primary identifier types.
Configure Gender
If you need custom values under the gender dropdown, add/edit an advanced settings property "mrs.genders" to have a custom value specified by a json structure. For example:
| Code Block | ||||
|---|---|---|---|---|
| ||||
{"M": "Male",
"F": "Female",
"O": Other} |
Pre-fill Address details based on login location
To use this functionality location needs to be configured as a login location in openmrs. The below configuration need to be added in registration/app.json is
| Code Block | ||||||
|---|---|---|---|---|---|---|
| ||||||
{
    "config": {
             "prepopulateFields" : ["Division", "Zilla", "Upazilla"]
        }
} |
The fields specified in the configuration need to be the address fields labels as seen on the registration page. This data will only be pre-filled when new patients are being created.
2. Configuration to Enter Patient Name Fields in Multi-language
![]()
One can enter the patient name fields like First Name, Middle Name, Last Name in multi language in Registration Page. For this we have to delete the regular expression that validates the English alphanumeric characters.
- Go to Openmrs → Admin → Advance Settings and delete patient.nameValidationRegex global property value
- Delete the familyName, givenName, middleName lines under fieldValidation section from /var/www/bahmni_config/openmrs/registration/app.json file.
| Code Block | ||
|---|---|---|
| ||
"familyName" : {"pattern" : "[a-zA-Z]{0,}", "errorMessage" : "Should contain characters"},
"givenName" : {"pattern" : "[a-zA-Z]{0,}", "errorMessage" : "Should contain characters"},
"middleName" : {"pattern" : "[a-zA-Z]{0,}", "errorMessage" : "Should contain characters"}, |
This will allow you to enter patient name in more than one language.
3. Configure Photo Capture
| Code Block | ||
|---|---|---|
| ||
"disablePhotoCapture": true |
Photo capture can be disabled in Bahmni registration based on implementation specific needs. Default behavior is to display photo capture in Registration page.The configuration must be applied to app.json in registration to disable photo capture. From Bahmni 0.90v, uploading the patient profile pic feature from registration page is also supported.
4. Configure Address Information
| Note |
|---|
This step is not mandatory. |
Addresses can be configured to be populated from a dictionary using the Address Hierarchy configuration in OpenMRS. An address hierarchy is maintained in the application to ensure that addresses are codified and human errors can be prevented while entering patient addresses.
5. Configure Additional Patient Information
| Note |
|---|
This step is not mandatory. |
Additional patient attributes that need to be captured can be configured by adding/changing OpenMRS' PersonAttributes. Further customizations can be performed on the Registration page via custom Bahmni configuration. Features include custom field level validations (mandatory fields, field value restrictions etc), show/hide fields, autocomplete, etc. See the Registration App Configuration section for more details.
Fields on the Additional Patient information section can also be configured using OpenMRS person attributes with some additional Bahmni configuration.
6. Configure Patient Relationships
| Note |
|---|
This step is not mandatory. |
The patient relationship functionality is used to maintain relationship information between various players within the application (Doctors, Nurses, Patients and Patient's relatives). There are three types of relationships that can be defined in the application
- Self relationship: This applies to patients who are registered into a program and then subsequently registered for another program. Consider a patient who is registered into a program with the ID GAN200013. If the the patient is the registered for another program, then during that subsequent registration, the patient can be linked with the initial ID GAN200013.
- Provider relationship: A doctor/nurse who administers to a patient can be added in the relationship field as a provider to the patient .
- Patient relationship: A patient can have a relationship with another patient such as father, mother, brother, sister, etc. This helps in tracking and screening prospective patients of communicable diseases like TB, HIV, etc.
In order to use the registration module to capture patient relationships, we need to:
- Add relationship types using the OpenMRS Admin UI.
- Configure a property called 'bahmni.relationshipTypeMap' in OpenMRS Advanced Settings to contain a json file that maps relationships to relationship types. A typical value would look like this {"provider":["Doctor"],"patient":["Parent","Sibling"]}.The list helps Bahmni identify how to autocomplete values for the field on the screen.
7. Configure Visits
Bahmni uses Visits as a way to record a patient's admittance to the hospital and also to track the various consultations the patient goes through during a round of admission.
Bahmni supports Visits to be categorized into different types. Having multiple types of visits is useful for:
- Reporting based on the number of visits per type.
- Configuring queues in other apps such as Clinical or Radiology.
Visit Setup
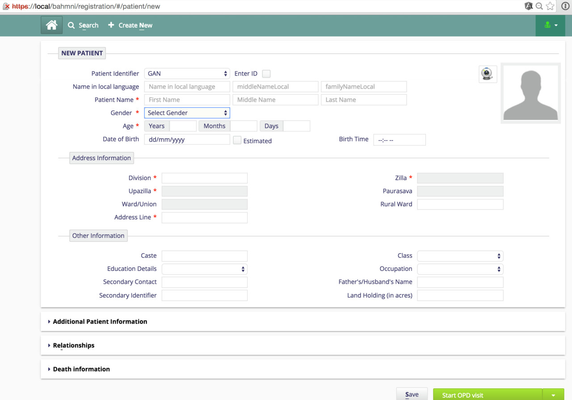
It is mandatory to set up at least one Visit type for an implementation. Visit types are shown as dropdown options when creating or editing a patient in Registration. Visit types can be added via the OpenMRS Admin screen. All visit types added show up in the Patient Registration screen (see the screenshot below).

"Default Visit Type" setup based on Login Location
| Info |
|---|
Available from release 0.78 onwards |
Bahmni supports default visit types to be set based on login location. The implementer will be able to set defaultVisitType for Location by adding entries to the entity_mapping table.
For example for Location Registration Desk, if the default visit type has to be OPD, it can be configured in the following way:
Run the queries below to set the default visit type:
| Code Block | ||||
|---|---|---|---|---|
| ||||
entity1_uuid - "SELECT uuid FROM location where name = 'Registration Desk';" . entity2_uuid -"SELECT uuid FROM visit_type where name = 'OPD;" entity_mapping_type_id -"SELECT id FROM entity_mapping_type where name = 'loginlocation_visittype';" |
Insert the UUID's and id in to entity_mapping tables:
| Code Block | ||||
|---|---|---|---|---|
| ||||
"INSERT INTO entity_mapping ( uuid, entity_mapping_type_id , entity1_uuid , entity2_uuid , date_created) VALUES (uuid(),9,'c5854fd7-3f12-11e4-adec-0800271c1b75','c2402997-3f10-11e4-adec-0800271c1b75','2015-11-25 14:43:56.0');" |
Doing this will ensure that when a user tries to create a new patient on the Registration page, the 'start OPD visit' will be displayed as the default visit type.
8. Configure Visit Details form:
Once user starts a visit page will redirect to visit details form(see the screenshot below).
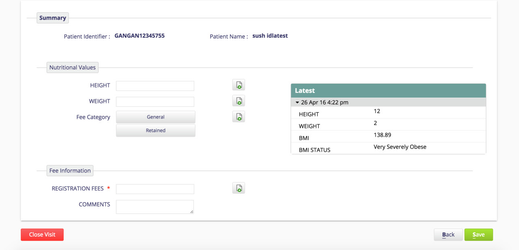
On the visit details form user can configure what data he/she want to capture as part of registration process.Those configurations will go under extension.json file. For reference please follow the link Default Config.
To add new section similar to Fee Information, user should create a new concept set. For more information please refer to the links below.
https://wiki.openmrs.org/display/docs/Create+and+Edit+Concepts
https://wiki.openmrs.org/display/docs/Managing+Concept+Sets
And then add the following configuration to extension.json file.
| Code Block |
|---|
"conceptSet":{
        "id": Unique id for the section, //Eg:"bahmni.registration.conceptSetGroup.feeInformation"
        "extensionPointId": "org.bahmni.registration.conceptSetGroup.observations",
        "type": "config",
        "extensionParams": {
            "conceptName": Concept set group name //Eg:"Fee Information"
            "translationKey": "FEE_INFORMATION_LOCALE_KEY", //For internationalization, not mandatory
            "required":true // true, if it mandatory otherwise false
        },
        "order": 2,
        "requiredPrivilege": "Edit Visits"
} |
From Bahmni release version-0.90 onwards, users are allowed to configure the new forms(created by form builder app) on the visit details page. Add the following configuration to the extension.json file.
| Code Block |
|---|
"formName":{
        "id": Unique id for the section, //Eg:"bahmni.registration.conceptSetGroup.feeInformation"
        "extensionPointId": "org.bahmni.registration.conceptSetGroup.observations",
        "type": "forms",
        "extensionParams": {
            "formName": "Nutritional Values", // Name of the form created using form builder
            "conceptNames": ["Height", "Weight", "BMI Data", "BMI Status Data"],
            "required":true,
            "showLatest": true
        },
        "order": 3,
        "requiredPrivilege": "Edit Visits"
} |
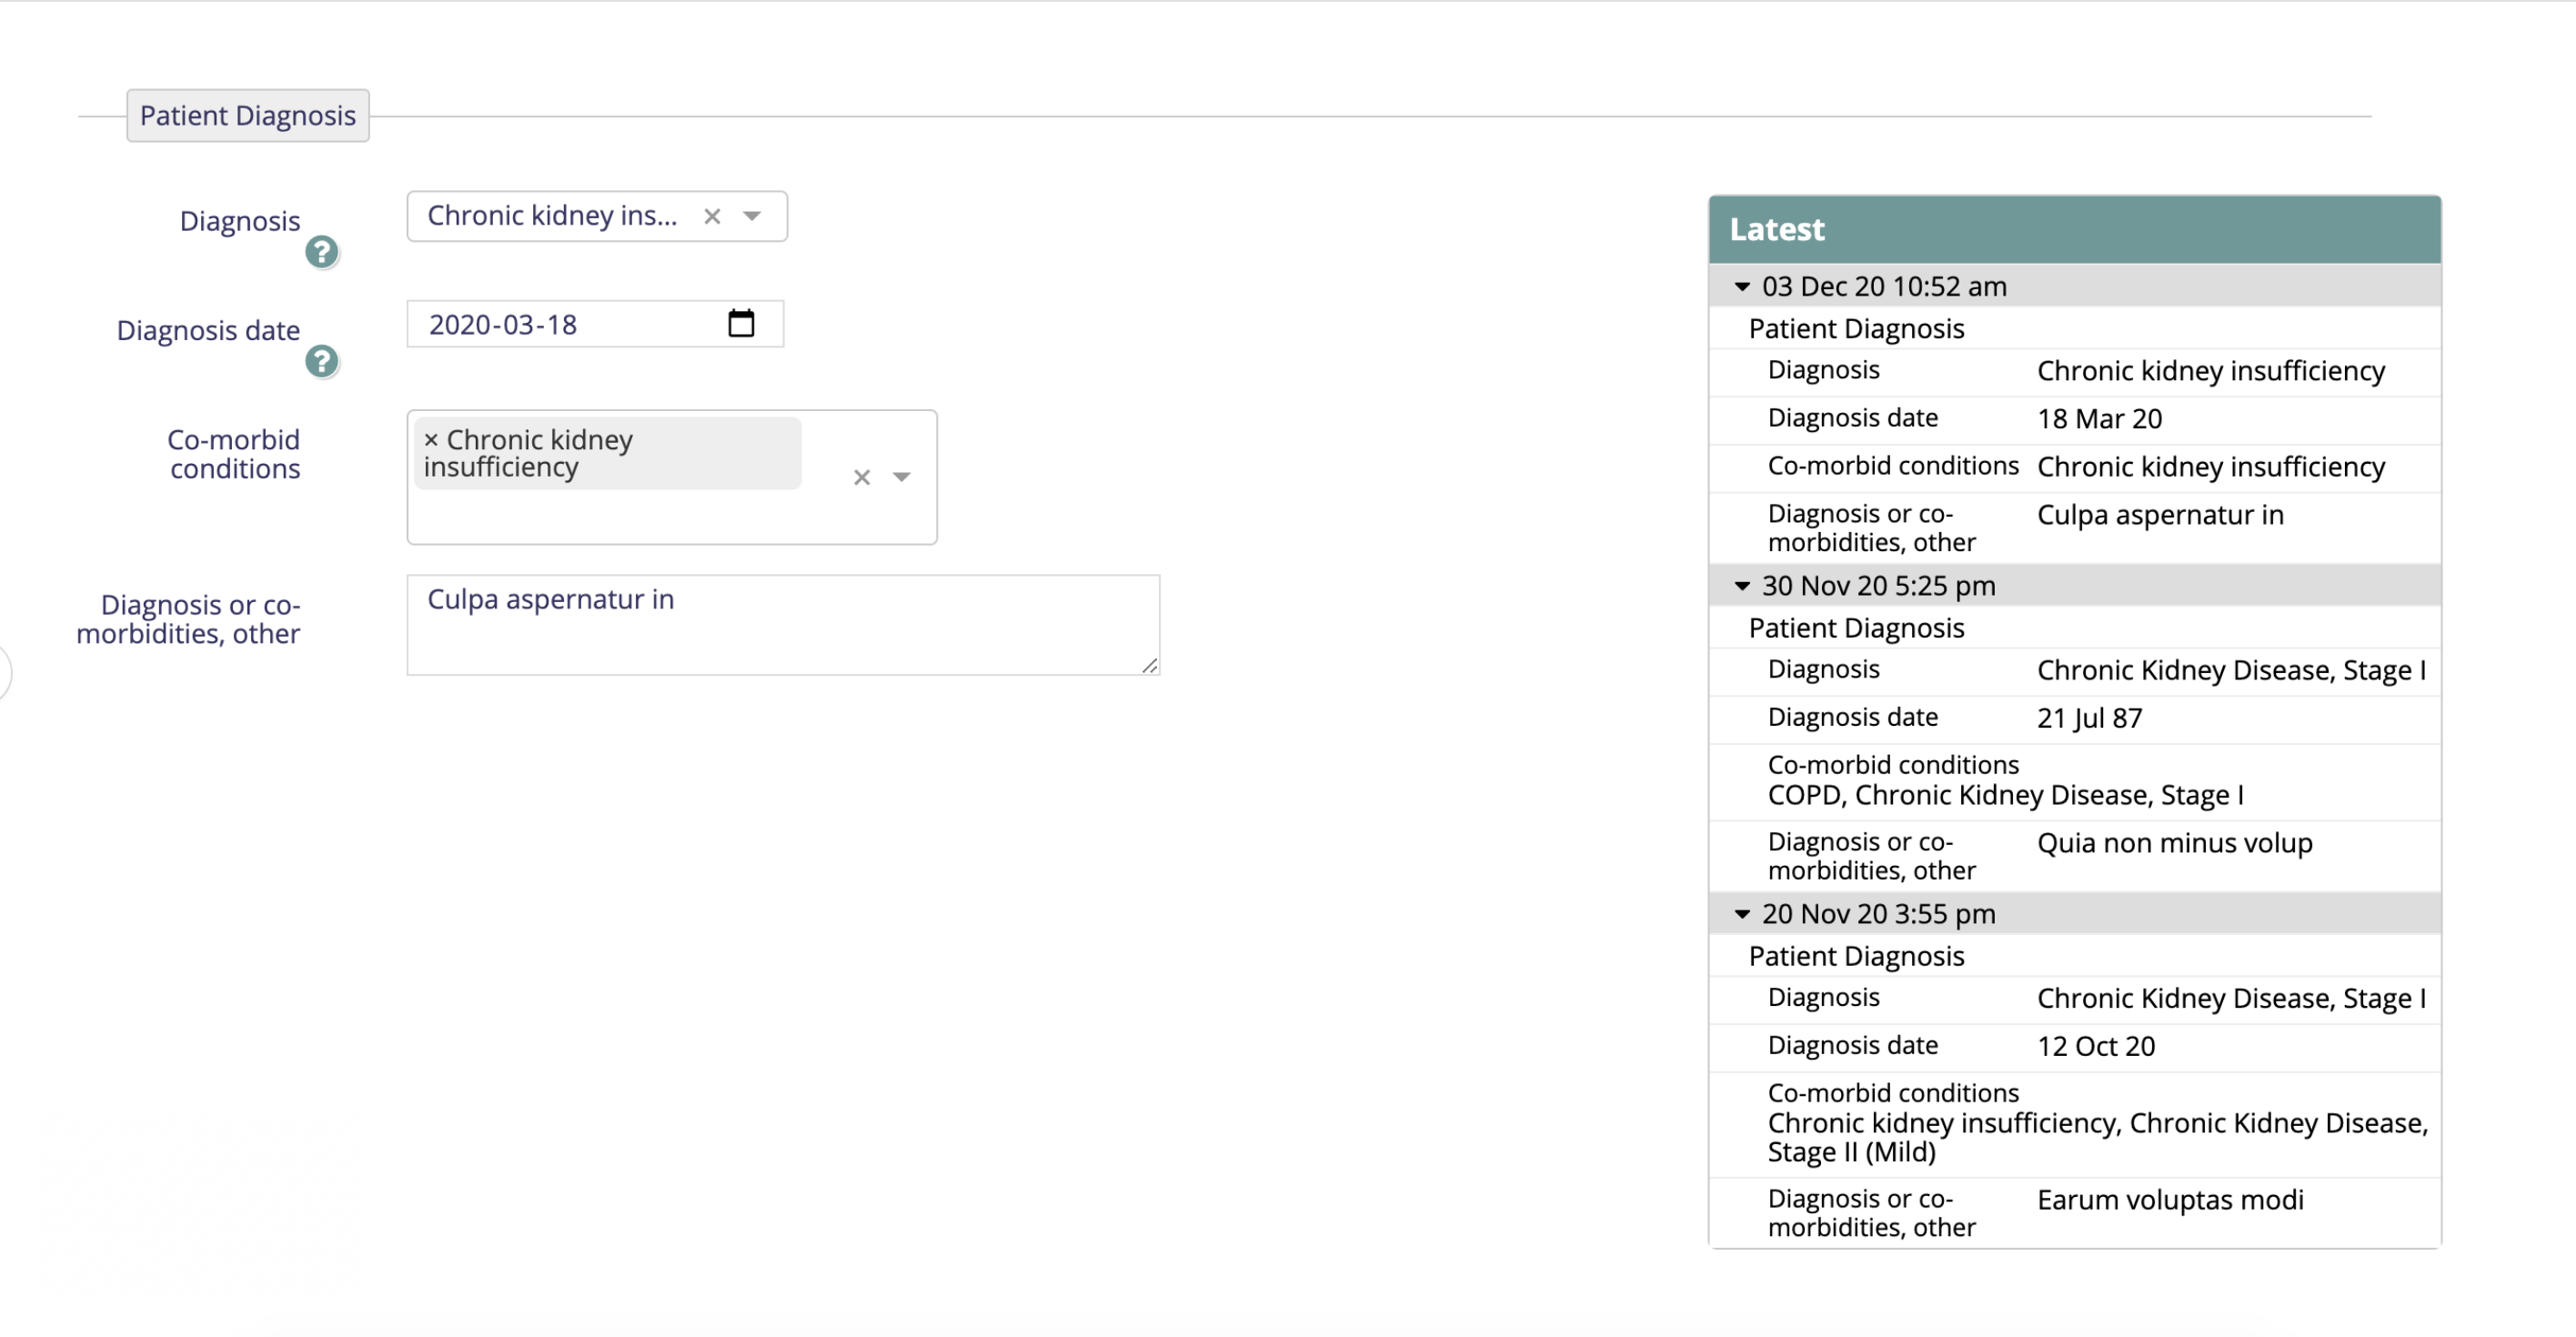
Display more than only 1 latest record in the registration 2nd page:
In the registration second page, for whatever the forms that we configured we will be able to see the latest observations captured for the concepts in the "latest" section as shown below. For now this is hardcoded to latest one record. To change that to more than one record, we don't have configuration property available for now. This requires adding numberOfVisits:5 inside config section in the visit.html file.
Before Change:

After Change:
Configure "Close Visit" Button
In scenarios where either a visit was accidentally started, or was not closed due to some procedural lapse, the hospital needs a capability to be able to "Close a Visit". A button can be added to the "Visit Details" page in the Registration module to allow Bahmni Users to close a visit. However, this button is visible only to those users who have been assigned the privilege "app:common:closeVisit". To assign this privilege, follow these steps:
- Go to the OpenMRS Admin page.
- Go to "Manage Roles".
- Select the role to which this privilege can be added. For e.g. "RegistrationClerk-Advanced".
- Assign the privilege "app:common:closeVisit" and click Save.
Ensure that the person who is supposed to perform this operation is assigned to this role.
9. Configuring 2nd page availability based on Visit type
Earlier if a single visit is configured, the registration second page can be configured to appear or not. However, if multiple visits are configured, the registration second page always comes up and there is no way to bypass it.
| Info |
|---|
| From 0.89 onwards, users can configure registration second page availability even when multiple visits are configured. |
On registration/app.json, add this config, under "config" section
| Code Block |
|---|
"forwardUrlsForVisitTypes": [
               {
                   "visitType": "First Stage Validation",
                   "forwardUrl": "../clinical/#/programs/patient/{{patientUuid}}/consultationContext",
                   "translationKey": "Enter Visit page details",
                   "shortcutKey": "c"
               },
               {
                   "visitType": "Follow-Up Validation",
                   "forwardUrl": "../document-upload/?encounterType=RADIOLOGY&topLevelConcept=Radiology#/patient/{{patientUuid}}/document",
                   "translationKey": "Enter <u>D</u>ocuments upload",
                   "shortcutKey": "d"
               }
] |
10. Death Information
Death Information has only one field that is configurable. To set it:
- Log into OpenMRS.
- Go to Concept Dictionary, and Add a new Concept Set that contains all possible death reasons. The reasons themselves will also be individual concepts.
- Add/Edit a property in Advanced Settings called concept.reasonForDeath with the fully qualified name of the concept set that was just created.
In summary the expectation is that the concept.reasonForDeath global property should store fully specified name of the concept set having reasons as set members.
| Note | ||
|---|---|---|
| ||
If the concept.reasonForDeath global property is not configured or configured with invalid concept name (which doesn't exist), then the death information section is hidden |
11. Configure Date of Birth
- Go to bahmni-config (an implementation-specific configuration folder). The settings are available at bahmni-config/openmrs/apps/registration/app.json.
- Add the following piece of configuration in the 'config' section of the file.
| Code Block | ||||
|---|---|---|---|---|
| ||||
"dobMandatory": true |
12. Configure to Hide Birth Time
- Go to bahmni-config (an implementation-specific configuration folder). The settings are available at bahmni-config/openmrs/apps/registration/app.json.
- Add the following piece of configuration in the 'config' section of the file.
| Code Block | ||||
|---|---|---|---|---|
| ||||
"showBirthTime": false |

13. Configure Enter ID field
We have Enter Id option if user wants to manually enter the patientId for the patient. By default this option is enabled.
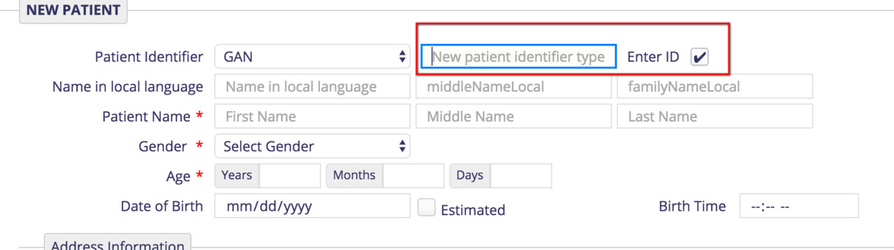
To restrict the users from manually entering the id, add the following configuration in app.json file under registration folder. Add the following under config section.
| Code Block | ||||
|---|---|---|---|---|
| ||||
"showEnterID":false |
14. Configure Display Order of Sections in Registration
The various sections under patient Information will be shown in the order of the "order" value that is present in the configuration. If some of the sections have an order value and other sections do not have the order value then all the sections with order value will be shown, while default behavior for the remaining sections will function As-Is. If none of the sections have order value, then default behavior(that is the order in which sections are entered) will be displayed.
- Go to bahmni-config (an implementation-specific configuration folder). The settings are available at bahmni-config/openmrs/apps/registration/app.json.
Add the following piece of configuration in the each section under 'patientInformation' of the file.
| Code Block | ||
|---|---|---|
| ||
"order" : 1 // order number specifies the sequence in which the section should be displayed |
15. Configure After Save Forward Url in Registration Visit Page
The Registration visit page save button action can be controlled through configuration. When one clicks the save button, one will be navigated to the configured url. Default behaviour is to stay on the same page (i.e.. visit page of registration), when there is no configuration available.
- Go to bahmni-config (an implementation-specific configuration folder). The settings are available at bahmni-config/openmrs/apps/registration/app.json.
Add the following piece of configuration under 'config' section of the file.
Code Block title Configuration for after save url in Registration Visit Page "afterVisitSaveForwardUrl" : "../clinical/#/default/patient/{{patientUuid}}/dashboard" // forward url to navigate after save (In this example after save one will be navigated to patient dashboard")
16. Show/Hide sections in Registration create patient page.
There can be many patient attribute sections in the registration page. We can show or hide each section based on a condition. This condition can be based on age, gender or any of the patient attributes.
For example:-
If age is less than 18, only then show the "Gaurdian Details" section.
Follow the steps given in this link.
17. Hide visit start button
On registration page, in case you would like to hide the 'start visit' button, you may disable it by doing the following in the "config" section.
| Code Block |
|---|
"config": {
   "showStartVisitButton": false
} |
Note that, turning off the visit start button is probably not very useful, as without a visit open, you may not record information for a patient. However, there are certain use cases like
- You are using Bahmni for just registration
- You are doing a phase wise rollout where you intend to start visit in subsequent phases.
- You are capturing data for the patient in retrospective mode
18. Configure display order of Patient Name fields
| Code Block | ||
|---|---|---|
| ||
"patientNameDisplayOrder": ["firstName", "middleName", "lastName"] |
Patient Name field can be configured only in Registration Page, by specifying the order in "patientNameDisplayOrder" setting in app.json
This configuration should include all the three fields in desired order.
If any invalid configuration is provided, the default behaviour is to display FirsName, MiddleName and LastName.
Use existing hide/show options of configuration for middleName and lastName.
Default behaviour is to display FirstName, MiddleName and LastName if specific configuration is not specified in app.json in registration.
| Panel | ||||
|---|---|---|---|---|
| ||||
|
| Panel | ||||||
|---|---|---|---|---|---|---|
| ||||||
| Panel | ||||||
|---|---|---|---|---|---|---|
| ||||||
| Panel | ||||||
|---|---|---|---|---|---|---|
| ||||||
Patient Photos and Related Workflow (OpenMRS Discussion) Person Attribute Configuration Configure Display Order of Patient Names |