| Warning |
|---|
|
There's been a security advisory from OpenMRS for webservices.rest module. As part of security Advisory, who ever planning to install Bahmni or already have installed Bahmni of versions 0.89, v0.90, v0.91 those have to replace existing webservices.rest module with 2.24.0 version module.
| Expand |
|---|
| title | Steps to replace webservices.rest module |
|---|
|
| Code Block |
|---|
#Go to openmrs modules path on Bahmni server
sudo cd /opt/openmrs/modules

# Stop openmrs service
sudo service openmrs stop

# Take a backup of existing webservice.rest module (Eg for Bahmni v0.91)
sudo mv webservices.rest-2.20.0.omod webservices.rest-2.20.0.omod.backup

# Download webservices.rest-2.24.0.omod using below command
sudo wget https://dl.bintray.com/openmrs/omod/webservices.rest-2.24.0.omod

# Give ownership to bahmni user
sudo chown bahmni:bahmni webservices.rest-2.24.0.omod

# Start Openmrs service
sudo service openmrs start
|
For more details on security advisory, please refer to below talk threads
https://talk.openmrs.org/t/critical-security-advisory-cve-2018-19276-2019-02-04/21607
https://talk.openmrs.org/t/update-for-cve-2018-19276-2019-02-04/21682
| Warning |
|---|
Please note, for Bahmni version 0.91 and earlier, we are no longer supporting Bahmni installation on CentOS 6.8 as centos has deprecated this version. You should have to choose either CentOS 6.7 or CentOS 6.9 for Bahmni installation. |
| Tip |
|---|
For production purposes, CentOS 7.6 64bit is the recommended & tested platform for running Bahmni version 0.92 and above. CentOS 7.5 is fine as well. The below mentioned process is based off installing RPMs. Depending on which Bahmni package you wish to install, you can choose to install the appropriate RPM. Each RPM now contains its embedded tomcat or web server, and becomes its own service, which can be started or stopped. List of RPMs: - bahmni-emr (Bahmni Backend)
- bahmni-web (Bahmni EMR UI)
- bahmni-reports (Bahmni Reports)
- bahmni-lab (OpenELIS)
- bahmni-erp (OpenERP / Odoo package)
- bahmni-event-log-service (separate web app to sync events created on Bahmni)
- pacs-integration (webapp to send radiology orders to PACS/Modality)
- dcm4chee (open-source PACS)
|
| Tip |
|---|
| title | Windows Installation |
|---|
|
If you want to install Bahmni for Development on your laptop (Windows, Mac or Linux), then you can choose to instead install the Bahmni Virtual Box. |
Installation
Step 1: Fresh CentOS v7.6
Create a fresh CentOS v7.6. You can read the System Requirements here.
| Tip |
|---|
|
If you don't have a CentOS box, or have a slow internet, you can perform these steps on a Cloud based CentOS, for instance on Digital Ocean. Please refer to this Wiki document on Deploying Bahmni on the Cloud. |
| Warning |
|---|
Bahmni v0.91 or earlier, does not work on CentOS v7.x, you need to choose either CentOS 6.7 or CentOS 6.9 for Bahmni v0.91 installation. |
| Note |
|---|
You have two options to install Bahmni. One is the latest v0.92 (or v0.91) version of Bahmni. Both the versions uses command line called "bahmni" which can be used to install and configure Bahmni. v0.92 is the recommended version. Alternatively, you can install v0.91 version of Bahmni which is the previous released version. Both options are documented below. Please refer to this document to read about the latest stable releases: ALL Bahmni Releases |
Fresh Bahmni Installation
| Expand |
|---|
| title | Installing Bahmni version 0.92 (Recommended) |
|---|
|
Steps for Installing Bahmni v0.92 This approach requires you to install the bahmni command line program first. Once "bahmni" command is installed, then you can choose your install settings, and related configurations to perform a specific Bahmni install. For now, we will install Bahmni with default configuration, and a demo database. For Advanced Installation steps, you can refer to this document later. All RPMs are posted on bintray for Bahmni. You can view them here. | Code Block |
|---|
#Prerequisite for the fresh installation of Bahmni
yum install -y https://kojipkgs.fedoraproject.org//packages/zlib/1.2.11/19.fc30/x86_64/zlib-1.2.11-19.fc30.x86_64.rpm
# Install the bahmni command line program (Choose the version you want).
yum install https://dl.bintray.com/bahmni/rpm/rpms/bahmni-installer-0.92-155.noarch.rpm
CentOS installation option of Bahmni is being deprecated! The recommended option moving forward is to use Docker version (for any OS) of Bahmni. Please see this documentation: Running Bahmni on Docker. |
| Tip |
|---|
For production purposes, CentOS 7.6 (64-bit) is the recommended & tested platform for running Bahmni version 0.92 and above. (CentOS 7.5 is fine as well). The below mentioned process is based off installing RPMs. Depending on which Bahmni package you wish to install, you can choose to install the appropriate RPM. Each RPM now contains its embedded tomcat or web server, and becomes its own service, which can be started or stopped. List of RPMs: - bahmni-emr (Bahmni Backend)
- bahmni-web (Bahmni EMR UI)
- bahmni-reports (Bahmni Reports)
- bahmni-lab (OpenELIS)
- bahmni-erp (OpenERP / Odoo package)
- bahmni-event-log-service (separate web app to sync events created on Bahmni)
- pacs-integration (webapp to send radiology orders to PACS/Modality)
- dcm4chee (open-source PACS)
|
| Tip |
|---|
| title | Windows Installation |
|---|
|
If you want to install Bahmni for Development on your laptop (Windows, Mac or Linux), then you can choose to instead install the Bahmni Virtual Box. (or Docker) |
Installation
Step 1: Fresh CentOS v7.6
Create a fresh CentOS v7.6. You can read the System Requirements here.
| Tip |
|---|
|
If you don't have a CentOS box, or have a slow internet, you can perform these steps on a Cloud based CentOS, for instance on Digital Ocean or AWS. Please refer to this Wiki document on Deploying Bahmni on the Cloud. |
| Note |
|---|
|
The latest version of Bahmni is v0.93, released on 26-Oct-2021. Please refer to this document to read about the latest stable releases: ALL Bahmni Releases |
Fresh Bahmni Installation
| Expand |
|---|
| title | Installing Bahmni version 0.93 (Recommended) |
|---|
|
Steps for Installing Bahmni v0.93 This approach requires you to install the bahmni command line program first. Once "bahmni" command is installed, then you can choose your install settings, and related configurations to perform a specific Bahmni install. For now, we will install Bahmni with default configuration, and a demo database. For Advanced Installation steps, you can refer to this document later. All RPMs are hosted here. | Code Block |
|---|
#Prerequisite for the fresh installation of Bahmni
yum install -y https://kojipkgs.fedoraproject.org//packages/zlib/1.2.11/19.fc30/x86_64/zlib-1.2.11-19.fc30.x86_64.rpm
yum install -y epel-release
pip install --upgrade pip
pip install babel==v1.0 python-stdnum urllib3==1.21.1 idna==2.5 chardet==3.0.2 certifi==2017.4.17 qrcode pyserial pypdf python-chart psycogreen passlib ofxparse requests

# Install the bahmni command line program (Choose the version you want)
yum install -y https://repo.mybahmni.org/releases/bahmni-installer-0.93-219.noarch.rpm

# download the postgres repo rpm. This is because wget fails to verify the keys.
# If you prefer the default download by wget, then you have to install the ca-certificates module
# and configure wget. Alternatively you can use curl like below.
# for more info check: https://talk.openmrs.org/t/bahmni-0-92-install-on-centos-7-6-minimal-fails/25416/48

# download postgres rpm
rm -f /opt/pgdg-redhat-repo-*
yum install -y wget
cd /opt && wget https://repo.mybahmni.org/releases/pgdg-redhat-repo-42.0-23.noarch.rpm
# Install Repo RPM and remove repo file
yum install -y /opt/pgdg-redhat-repo-42.0-23.noarch.rpm
rm -f /etc/yum.repos.d/pgdg-redhat-all.repo

# Confirm that the bahmni command is correctly installed (you should see a help message for the command)
bahmni --help

# Now setup a configuration file for bahmni command in /etc/bahmni-installer.

curl -L https://tinyurl.com/yyoj98df >> /etc/# Note, before running the below command check whether the /etc/bahmni-installer/setup.yml  already #exists Confirm the contents of the fileor not. It
should look like this file: (curl -L https://gootinyurl.glcom/R8ekg5)yyoj98df cat>> /etc/bahmni-installer/setup.yml

# TheEdit abovethe setup.yml, hasfile aand timezoneadd entry.the YouBahmni canRepo changeURL it
to suit your timezone if you like. For valid options
# please read this document: https://bahmni.atlassian.net/wiki/display/BAH/List+Of+Configurable+Installation+Variables

# Set the inventory file name to local in BAHMNI_INVENTORY environment variable. vi /etc/bahmni-installer/setup.yml
bahmni_repo_url: https://repo.mybahmni.org/releases/

# Confirm the contents of the file. It should look like this file: (https://goo.gl/R8ekg5)
cat /etc/bahmni-installer/setup.yml

# The above setup.yml, has a timezone entry. You can change it to suit your timezone if you like. For valid options
# please read this document: https://bahmni.atlassian.net/wiki/display/BAH/List+Of+Configurable+Installation+Variables

# Optionally set the inventory file name to local in BAHMNI_INVENTORY environment variable. This way you won't need to use the '-i local' switch every time you use the 'bahmni' command.
# #YouYou can also configure custom inventory file instead of local.
echo "export BAHMNI_INVENTORY=local" >> ~/.bashrc
source ~/.bashrc

# Nowconfigure fire the installer
bahmni install
components you require. Edit the inventory file (or your custom inventory file)
vi /etc/bahmni-installer/local


# Now fire the installer. If you have exported the variable as above you can ignore the "-i local" option.
bahmni -i local install


# The installation should be done in about 15 - 30 minutes depending on your internet speed.
# Verify installed components using the command:
yum list installed | grep bahmni |
Sample install log attached here for reference. |
| Expand |
|---|
| title | Installing Bahmni version 0.91 |
|---|
| Steps for Installing Bahmni v0.91
This approach requires you to install the bahmni command line program first. Once "bahmni" command is installed, then you can choose your install settings, and related configurations to perform a specific Bahmni install. For now, we will install Bahmni with default configuration, and a demo database. For Advanced Installation steps, you can refer to this document later. All RPMs are posted on bintray for Bahmni. You can view them here.
| Code Block |
|---|
#Prerequisite for the fresh installation of Bahmni
yum upgrade python-setuptools

# Prerequisite Click 7.0 for fresh installation of Bahmni
# Download Click 7.0 to /home/bahmni
wget https://files.pythonhosted.org/packages/f8/5c/f60e9d8a1e77005f664b76ff8aeaee5bc05d0a91798afd7f53fc998dbc47/Click-7.0.tar.gz -P /home/bahmni
# Extract tar file
cd /home/bahmni
tar -xvf Click-7.0.tar.gz
# Install Click 7.0
cd Click-7.0
python setup.py install

# Install the bahmni command line program (Choose the version you want).
yum install https://dl.bintray.com/bahmni/rpm/rpms/bahmni-installer-0.91-89.noarch.rpm  #version 0.91

# Confirm that the bahmni command is correctly installed (you should see a help message for the command)
bahmni --help

# Now setup a configuration file for bahmni command in /etc/bahmni-installer.
curl -L https://goo.gl/R8ekg5 >> /etc/bahmni-installer/setup.yml

# Confirm the contents of the file. It should look like this file: (https://goo.gl/R8ekg5)
cat /etc/bahmni-installer/setup.yml

# Run below command to add mx_download_url to setup.yml file
printf "\nmx_download_url: https://dl.bintray.com/bahmni/rpm/mx-1.4.5-1-mdv2012.0.i586.rpm" >> /etc/bahmni-installer/setup.yml

# The above setup.yml, has a timezone entry. You can change it to suit your timezone if you like. For valid options
# please read this document: https://bahmni.atlassian.net/wiki/display/BAH/List+Of+Configurable+Installation+Variables

# Set the inventory file name to local in BAHMNI_INVENTORY environment variable. This way you won't need to use the '-i local' switch every time you use the 'bahmni' command
#You can also configure custom inventory file instead of local.
echo "export BAHMNI_INVENTORY=local" >> ~/.bashrc
source ~/.bashrc

# Now fire the installer
bahmni install

# The installation should be done in about 15 - 30 minutes depending on your internet speed.
# Verify installed components using the command:
yum list installed | grep bahmni |
| Expand |
|---|
| title | Installing Bahmni version 0.90 |
|---|
|
Steps for Installing Bahmni v0.90
This approach requires you to install the bahmni command line program first. Once "bahmni" command is installed, then you can choose your install settings, and related configurations to perform a specific Bahmni install. For now, we will install Bahmni with default configuration, and a demo database. For Advanced Installation steps, you can refer to this document later. All RPMs are posted on bintray for Bahmni. You can view them here.
| Code Block |
|---|
#Prerequisite for the fresh installation of Bahmni
yum upgrade python-setuptools

# Prerequisite Click 7.0 for fresh installation of Bahmni
# Download Click 7.0 to /home/bahmni
wget https://files.pythonhosted.org/packages/f8/5c/f60e9d8a1e77005f664b76ff8aeaee5bc05d0a91798afd7f53fc998dbc47/Click-7.0.tar.gz -P /home/bahmni
# Extract tar file
cd /home/bahmni
tar -xvf Click-7.0.tar.gz
# Install Click 7.0
cd Click-7.0
python setup.py install

# Install the bahmni command line program (Choose the version you want).
yum install https://dl.bintray.com/bahmni/rpm/rpms/bahmni-installer-0.90-308.noarch.rpm  #version 0.90

# Confirm that the bahmni command is correctly installed (you should see a help message for the command)
bahmni --help

# Now setup a configuration file for bahmni command in /etc/bahmni-installer.
curl -L https://goo.gl/R8ekg5 >> /etc/bahmni-installer/setup.yml

# Confirm the contents of the file. It should look like this file: (https://goo.gl/R8ekg5)
cat /etc/bahmni-installer/setup.yml

# Run below command to add mx_download_url to setup.yml file
printf "\nmx_download_url: https://dl.bintray.com/bahmni/rpm/mx-1.4.5-1-mdv2012.0.i586.rpm" >> /etc/bahmni-installer/setup.yml

# The above setup.yml, has a timezone entry. You can change it to suit your timezone if you like. For valid options
# please read this document: https://bahmni.atlassian.net/wiki/display/BAH/List+Of+Configurable+Installation+Variables

# Set the inventory file name to local in BAHMNI_INVENTORY environment variable. This way you won't need to use the '-i local' switch every time you use the 'bahmni' command
#You can also configure custom inventory file instead of local.
echo "export BAHMNI_INVENTORY=local" >> ~/.bashrc
source ~/.bashrc

# Now fire the installer
bahmni install

# The installation should be done in about 15 - 30 minutes depending on your internet speed.
# Verify installed components using the command:
yum list installed | grep bahmni |
| Expand |
|---|
| title | Installing Bahmni version 0.89 |
|---|
|
Steps for Installing Bahmni v0.89
This approach requires | Click here to expand for OLDER version of Bahmni... |
|
| Warning |
|---|
| title | For Bahmni v0.92 or earlier |
|---|
| Bahmni Release repo has been migrated out of Bintray. For installations, you will need to do the following for versions 0.92 or earlier | Code Block |
|---|
# Bahmni installer location
yum install https://repo.mybahmni.org/releases/bahmni-installer-0.92-155.noarch.rpm

# Setting up the RPM repo. Edit the setup.yml file and add the Bahmni Repo URL
bahmni_repo_url: https://repo.mybahmni.org/releases/

# Running the installer
bahmni -i local -aru https://repo.mybahmni.org/releases/ansible-2.4.6.0-1.el7.ans.noarch.rpm install
|
|
| Expand |
|---|
| title | Installing Bahmni version 0.92 |
|---|
| Steps for Installing Bahmni v0.92 This approach requires you to install the bahmni command line program first. Once "bahmni" command is installed, then you can choose your install settings, and related configurations to perform a specific Bahmni install. For now, we will install Bahmni with default configuration, and a demo database. For Advanced Installation steps, you can refer to this document later. All RPMs are hosted here. | Code Block |
|---|
#Prerequisite for the fresh installation of Bahmni
yum install -y https://kojipkgs.fedoraproject.org//packages/zlib/1.2.11/19.fc30/x86_64/zlib-1.2.11-19.fc30.x86_64.rpm

#Due to the non-availability of certain python distributions, the following steps needs to be executed to have a successful installation.

sudo yum install epel-release
sudo yum install python-pip
sudo pip install pip==v19.0
sudo pip uninstall click
sudo pip install click==v7.0
sudo pip install pyusb
sudo pip install babel==v0.9.6
sudo pip install decorator==v3.4.0
sudo pip install beautifulsoup4

# Install the bahmni command line program (Choose the version you want)
yum install  https://repo.mybahmni.org/releases/bahmni-installer-0.92-155.noarch.rpm

# Confirm that the bahmni command is correctly installed (you should see a help message for the command)
bahmni --help

# Now setup a configuration file for bahmni command in /etc/bahmni-installer.
curl -L https://tinyurl.com/yyoj98df >> /etc/bahmni-installer/setup.yml

# Edit the setup.yml file and add the Bahmni Repo URL (for version 0.92 and earlier)
bahmni_repo_url: https://repo.mybahmni.org/releases/

# Confirm the contents of the file. It should look like this file: (https://goo.gl/R8ekg5)
cat /etc/bahmni-installer/setup.yml

# The above setup.yml, has a timezone entry. You can change it to suit your timezone if you like. For valid options
# please read this document: https://bahmni.atlassian.net/wiki/display/BAH/List+Of+Configurable+Installation+Variables

# Set the inventory file name to local in BAHMNI_INVENTORY environment variable. This way you won't need to use the '-i local' switch every time you use the 'bahmni' command
#You can also configure custom inventory file instead of local.
echo "export BAHMNI_INVENTORY=local" >> ~/.bashrc
source ~/.bashrc

# Now fire the installer
# For 0.92 or earlier
bahmni -aru https://repo.mybahmni.org/releases/ansible-2.4.6.0-1.el7.ans.noarch.rpm install
# or for 0.93
bahmni install

# The installation should be done in about 15 - 30 minutes depending on your internet speed.
# Verify installed components using the command:
yum list installed | grep bahmni |
|
| Warning |
|---|
| title | Bahmni v0.91 or Earlier |
|---|
| Bahmni v0.91 or earlier, does not work on CentOS v7.x, you need to choose either CentOS 6.7 or CentOS 6.9 for Bahmni v0.91 installation. |
| Warning |
|---|
| There's been a security advisory from OpenMRS for webservices.rest module. As part of security Advisory, who ever planning to install Bahmni or already have installed Bahmni of versions 0.89, v0.90, v0.91 those have to replace existing webservices.rest module with 2.24.0 version module. | Expand |
|---|
| title | Steps to replace webservices.rest module |
|---|
|
| Code Block |
|---|
#Go to openmrs modules path on Bahmni server
sudo cd /opt/openmrs/modules

# Stop openmrs service
sudo service openmrs stop

# Take a backup of existing webservice.rest module (Eg for Bahmni v0.91)
sudo mv webservices.rest-2.20.0.omod webservices.rest-2.20.0.omod.backup

# Download webservices.rest-2.24.0.omod using below command
sudo wget https://repo.mybahmni.org/packages/libraries/webservices.rest-2.24.0.omod

# Give ownership to bahmni user
sudo chown bahmni:bahmni webservices.rest-2.24.0.omod

# Start Openmrs service
sudo service openmrs start
|
|
For more details on security advisory, please refer to below talk threads https://talk.openmrs.org/t/critical-security-advisory-cve-2018-19276-2019-02-04/21607 https://talk.openmrs.org/t/update-for-cve-2018-19276-2019-02-04/21682 |
| Warning |
|---|
Please note, for Bahmni version 0.91 and earlier, we are no longer supporting Bahmni installation on CentOS 6.8 as centos has deprecated this version. You should have to choose either CentOS 6.7 or CentOS 6.9 for Bahmni installation. |
| Expand |
|---|
| title | Installing Bahmni version 0.91 |
|---|
| Steps for Installing Bahmni v0.91 This approach requires you to install the bahmni command line program first. Once "bahmni" command is installed, then you can choose your install settings, and related configurations to perform a specific Bahmni install. For now, we will install Bahmni with default configuration, and a demo database. For Advanced Installation steps, you can refer to this document later. All RPMs are |
posted on bintray for Bahmni. You can view them available here. #Prerequisite for the fresh installation of Bahmni
yum upgrade python-setuptools
# |
Install the bahmni command line program.
yum installPrerequisite Click 7.0 for fresh installation of Bahmni
# Download Click 7.0 to /home/bahmni
wget https:// |
dlbintraycombahmnirpmrpmsf60e9d8a1e77005f664b76ff8aeaee5bc05d0a91798afd7f53fc998dbc47/ |
bahmniinstaller-89-193.noarch.rpm #version 0.89
# Confirm that the bahmni command is correctly installed (you should see a help message for the command)
bahmni --help
# Now setup a configuration file for bahmni command in /etc/bahmni-installer.
curl -L http://tiny.cc/defaultsetup >> /etc/bahmni-installer/setup.yml
# Confirm the contents of the file. It should look like this file: ( http://tiny.cc/defaultsetup )
cat /etc/bahmni-installer/setup.yml
# The above setup.yml, has a timezone entry. You can change it to suit your timezone if you like. For valid options
# please read this document: https://bahmni.atlassian.net/wiki/display/BAH/List+Of+Configurable+Installation+Variables
# Set the inventory file name to local in BAHMNI_INVENTORY environment variable. This way you won't need to use the '-i local' switch every time you use the 'bahmni' command
#You can also configure custom inventory file instead of local.
echo "export BAHMNI_INVENTORY=local" >> ~/.bashrc
source ~/.bashrc
# Now fire the installer
bahmni install
# The installation should be done in about 15 - 30 minutes depending on your internet speed.
# Verify installed components using the command:
yum list installed | grep bahmni
| | Info |
|---|
| title | Workaround for bahmni-erp |
|---|
| If you run into a dependency resolution error for the mx package during the installation of the bahmni-erp-0.89-43.noarch, you could apply the workaround described in the forum: https://talk.openmrs.org/t/openerp-not-installing/10975/4tar.gz -P /home/bahmni
# Extract tar file
cd /home/bahmni
tar -xvf Click-7.0.tar.gz
# Install Click 7.0
cd Click-7.0
python setup.py install
# Install the bahmni command line program (Choose the version you want).
yum install https://repo.mybahmni.org/releases/bahmni-installer-0.91-89.noarch.rpm #version 0.91
# Confirm that the bahmni command is correctly installed (you should see a help message for the command)
bahmni --help
# Now setup a configuration file for bahmni command in /etc/bahmni-installer.
curl -L https://goo.gl/R8ekg5 >> /etc/bahmni-installer/setup.yml
# Confirm the contents of the file. It should look like this file: (https://goo.gl/R8ekg5)
cat /etc/bahmni-installer/setup.yml
# Run below command to add mx_download_url to setup.yml file
printf "\nmx_download_url: https://repo.mybahmni.org/releases/mx-1.4.5-1-mdv2012.0.i586.rpm" >> /etc/bahmni-installer/setup.yml
# The above setup.yml, has a timezone entry. You can change it to suit your timezone if you like. For valid options
# please read this document: https://bahmni.atlassian.net/wiki/display/BAH/List+Of+Configurable+Installation+Variables
# Set the inventory file name to local in BAHMNI_INVENTORY environment variable. This way you won't need to use the '-i local' switch every time you use the 'bahmni' command
#You can also configure custom inventory file instead of local.
echo "export BAHMNI_INVENTORY=local" >> ~/.bashrc
source ~/.bashrc
# Now fire the installer
bahmni install
# The installation should be done in about 15 - 30 minutes depending on your internet speed.
# Verify installed components using the command:
yum list installed | grep bahmni |
|
| Expand |
|---|
| title | Installing Bahmni version 0. |
|---|
|
| 88 | Steps for Installing Bahmni v0. |
8890 This approach requires you to install the bahmni command line program first. Once "bahmni" command is installed, then you can choose your install settings, and related configurations to perform a specific Bahmni install. For now, we will install Bahmni with default configuration, and a demo database. For Advanced Installation steps, you can refer to this document later. All RPMs are |
posted on bintray for Bahmni. You can view them |
Bahmni Services
The following are the various services on your machine, related to Bahmni:
| Code Block |
|---|
# command to list all services
sudo service --status-all

# command to list all configured services
chkconfig --list

# Command to start or stop a service is: service <service-name> start | stop | status | restart
# -----------------------------------------------------------------------------------------------

# Check status of Apache httpd service (runs Bahmni EMR UI)
sudo service httpd status

# Check status of OpenMRS Backend (needed for Bahmni EMR UI to talk to OpenMRS)
sudo service openmrs status

# Check status of Reports (needed to see reports inside EMR UI)
sudo service bahmni-reports status

# Check status of OpenELIS / Bahmni-Lab
sudo service bahmni-lab status

# Check status of Odoo (For Bahmni version 0.92 and above)
sudo service odoo status

# Check status of OpenERP (For Bahmni version 0.91 and earlier)
sudo service openerp status

# Check status of Bahmni and ERP Connector (for data sync between systems)
sudo service bahmni-erp-connect status

# Check the status of atomfeed-console Service (Looking at the failed events and retrying failed events)
sudo service atomfeed-console status

# Databases needed to be running (mysqld for Bahmni EMR / OpenMRS, and Postgres for Lab and ERP)
sudo service mysqld status

# Check status of postgres (For Bahmni version 0.92 and above)
sudo service postgresql-9.6 status

# Check status of postgres (For Bahmni version 0.91 and earlier)
sudo service postgresql-9.2 status
|
| Code Block |
|---|
| title | Service start commands for Bahmni |
|---|
|
# Start all services
sudo service mysqld start
sudo service postgresql-9.6 start
sudo service openmrs start
sudo service httpd start
sudo service bahmni-reports start
sudo service bahmni-lab start
sudo service odoo start
sudo service bahmni-erp-connect start
sudo service atomfeed-console start
sudo service pacs-integration start
|
Navigating the File System
Post install, the various sub-systems are installed and accessible in the following locations:
| Code Block |
|---|
| title | Application Install Locations |
|---|
|
# All applications are installed in /opt
cd /opt

# Location for Bahmni EMR UI and config (app deployed in Apache httpd server)
cd /var/www

# Location for OpenMRS (contains embedded tomcat)
cd /opt/openmrs

# Location for OpenMRS modules
cd /opt/openmrs/modules

# Location for Bahmni lab / OpenELIS (contains embedded tomcat)
cd /opt/bahmni-lab

# Location for Bahmni ERP / OpenERP
cd /opt/bahmni-erp

# Location for Bahmni reports (accessed from EMR UI Reports Button on Home Screen)
cd /opt/bahmni-reports

# Location for Bahmni pacs-integration service
cd /opt/pacs-integration |
| Code Block |
|---|
|
# Most Bahmni related Log files are located in /var/log in respective sub-folders bahmni-lab, openmrs, etc.
# These are all soft links into /opt/app-name/log folder.
cd /var/log

# Client side logs (javascript errors) -- uses StackTrace.js library
cd /var/log/client-side-logs

# pgsql logs (Bahmni 0.92 and above)
cd /var/lib/pgsql/9.6/data/pg_log/

# pgsql logs (Bahmni 0.91 and earlier)
cd /var/lib/pgsql/9.2/data/pg_log/

# mySQL log file /var/log/mysqld.log

# DCM4CHEE log file /var/lib/bahmni/dcm4chee-2.18.1-psql/server/default/log/server.log |
Figuring out which RPM versions of Bahmni are installed
| Code Block |
|---|
yum list installed | grep bahmni |
This is a sample screenshot of the command:
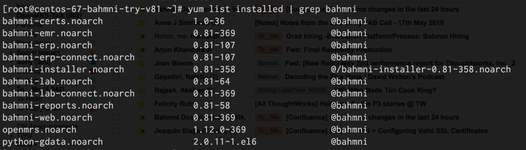 Image Removed
Installing dcm4chee & pacs-integration server for Radiology
Bahmni supports Radiology features that will allow you to view X-Rays and other DICOM images within Bahmni, including the ability to place such orders and make them automatically reach the machine (modality). For making this work, one needs to install dcm4chee (an open source PACS/DICOM server) and bahmni pacs-integration service (that acts as a bridge between Bahmni & dcm4chee). To install these two components perform the following steps:
Bahmni uses Ansible under-the-hood to install components on the Linux server. To enable installation of these two components, edit the local (default) inventory file and add localhost under the following sections (run command as root since this file is owned by root):
| Code Block |
|---|
> vi /etc/bahmni-installer/local

# Add "localhost" under the following sections like this:
[pacs-integration]
localhost

[pacs-integration-db]
localhost

[dcm4chee]
localhost

[dcm4chee-db]
localhost
|
Now re-run the bahmni install command: "bahmni install" from command line. This will re-trigger bahmni installation, and Ansible will re-check all configurations, ignore most of them (since they are already installed) and will ONLY install the relevant rpms needed for pacs-integration and dcm4chee (including postgres database). After the installer has finished running, you should be able to open and see dcm4chee running on url: https://192.168.33.10/dcm4chee-web3/ (Creds: admin/admin).Once you have done the above 3 steps and all looks good, you need to perform some additional steps (like configuring Database and setting up an actual machine (or modality) or a Test modality). For that please read this documentation: Radiology and PACS IntegrationSecuring & Protecting the Bahmni Server
| Warning |
|---|
It is very important to take your server security seriously. Please ensure you setup adequate security controls for your Bahmni server, including firewalls, strong passwords, key based ssh access, https certificates, etc. |
| Info |
|---|
A collection of recommended security settings for CentOS V7 server can be found here. |
| Panel |
|---|
| bgColor | #FFFBD0 |
|---|
| titleColor | white |
|---|
| titleBGColor | #F17D80 |
|---|
| title | Securing and Protecting The Bahmni Server |
|---|
|
FirewallTo keep the Bahmni CentOS server secure, it is recommended that you setup a firewall which blocks access to ALL incoming traffic, except the following: - SSH Port (if you want to enable remote SSH)
- HTTP/HTTPs Ports of Bahmni, so that one can access Bahmni via browser / tablet device.
Please refer to this document (and script) to understand how to possibly setup iptable firewall on your Centos machine. iptable is the default firewall on CentOS Linux. SSL CertificatesPlease read the following document to understand how can you generate SSL certificates for HTTPs connections in Bahmni. This will ensure your connections over Bahmni are encrypted. - Configure Valid SSL Certificates
SSH Security- It is recommended to disable password based ssh (/etc/ssh/sshd_config file), and instead always use key based authentication.
- Disable access to all other users besides the ones you want to allow ssh to (DenyUsers configuration key)
- For more good tips please read:
- http://www.tecmint.com/5-best-practices-to-secure-and-protect-ssh-server/
- https://www.howtoforge.com/tutorial/openssh-security-best-practices/
Change Default PasswordsIt is strongly recommended to change default user passwords for better security of your Bahmni server. Please refer to the list of configurable installation variables here. Other Security RecommendationsPlease read this document to understand other security measures you can take for your Bahmni server: https://www.digitalocean.com/community/tutorials/7-security-measures-to-protect-your-servers.You can also consider installing intrusion detection softwares like Fail2Ban, which monitor intrusion attempts to your server, and block that traffic temporarily.available here. # Prerequisite#Prerequisite for the fresh installation of Bahmni
yum upgrade python-setuptools
# Prerequisite |
Installthebahmnicommandlineprogram(Choosetheversionyouwant)yum install/home/bahmni
wget https:// |
dlbintraycombahmnirpmrpmsf60e9d8a1e77005f664b76ff8aeaee5bc05d0a91798afd7f53fc998dbc47/ |
bahmniinstaller-88-101.noarch.rpm #version 0.88
# Confirm that the bahmni command is correctly installed (you should see a help message for the command)
bahmni --help
# Now setup a configuration file for bahmni command in /etc/bahmni-installer.
curl -L https://goo.gl/R8ekg5 >> /etc/bahmni-installer/setup.yml
# Confirm the contents of the file. It should look like this file: (https://goo.gl/R8ekg5)
cat /etc/bahmni-installer/setup.yml
# The above setup.yml, has a timezone entry. You can change it to suit your timezone if you like. For valid options
# please read this document: https://bahmni.atlassian.net/wiki/display/BAH/List+Of+Configurable+Installation+Variables
# Now fire the installer
bahmni -i local install #instead of local you can use your custom inventory file
# The installation should be done in about 15 - 30 minutes depending on your internet speed.
# Verify installed components using the command:
yum list installed | grep bahmni
|
|
| Expand |
|---|
| title | Installing Bahmni version 0.87 |
|---|
|
Steps for Installing Bahmni v0.87
This approach requires you to install the bahmni command line program first. Once "bahmni" command is installed, then you can choose your install settings, and related configurations to perform a specific Bahmni install. For now, we will install Bahmni with default configuration, and a demo database. For Advanced Installation steps, you can refer to this document later. All RPMs are posted on bintray for Bahmni. You can view them here.
| Code Block |
|---|
# Install the bahmni command line program (Choose the version you want).
yum install https://dl.bintray.com/bahmni/rpm/rpms/bahmni-installer-0.87-81.noarch.rpm  #version 0.87

# Confirm that the bahmni command is correctly installed (you should see a help message for the command)
bahmni --help

# Now setup a configuration file for bahmni command in /etc/bahmni-installer.
curl -L https://goo.gl/R8ekg5 >> /etc/bahmni-installer/setup.yml

# Confirm the contents of the file. It should look like this file: (https://goo.gl/R8ekg5)
cat /etc/bahmni-installer/setup.yml

# The above setup.yml, has a timezone entry. You can change it to suit your timezone if you like. For valid options
# please read this document: https://bahmni.atlassian.net/wiki/display/BAH/List+Of+Configurable+Installation+Variables

# Now fire the installer
bahmni -i local install #instead of local you can use your custom inventory file

# The installation should be done in about 15 - 30 minutes depending on your internet speed.
# Verify installed components using the command:
yum list installed | grep bahmni
|
Upgrade Bahmni to Latest Version
If Bahmni is already installed in the server which is a older version and want to upgrade to latest released version please follow the steps mentioned here.
| Expand |
|---|
| title | Bahmni 0.92 Upgrade instructions |
|---|
|
Steps to Upgrade Bahmni to 0.92 Version
Since Bahmni 0.92 is targeted for CentOS 7.6, you can not just overwrite the previous version which would be running on CentOS 6.x. You would need to provision a new machine with CentOS 7.6 first. However, you can restore your databases, images, docs as before.
| Code Block |
|---|
# Install the bahmni command line program
yum install https://dl.bintray.com/bahmni/rpm/rpms/bahmni-installer-0.92-155.noarch.rpm  #version 0.92

# Confirm that the bahmni command is correctly installed (you should see a help message for the command)
bahmni --help

# Now fire the installer
bahmni -i local install

# The installation should be done in about 15 - 30 minutes depending on your internet speed.
# Verify installed components using the command:
yum list installed | grep bahmni |
| Expand |
|---|
| title | Bahmni 0.91 Upgrade instructions |
|---|
|
Steps to Upgrade Bahmni to 0.91 Version
The below commands will upgrade Bahmni to 0.91 version. But this will override the existing inventory file. Please check the inventory (local) file before running install command.
| Code Block |
|---|
# Install the bahmni command line program
yum update https://dl.bintray.com/bahmni/rpm/rpms/bahmni-installer-0.91-89.noarch.rpm  #version 0.91

# Confirm that the bahmni command is correctly installed (you should see a help message for the command)
bahmni --help

# Now fire the installer
bahmni -i local install

# The installation should be done in about 15 - 30 minutes depending on your internet speed.
# Verify installed components using the command:
yum list installed | grep bahmni |
| Tip |
|---|
| title | Limited Internet Installation |
|---|
|
If you wish to install Bahmni on a machine that does NOT have internet access, then you will need to download all the necessary RPMs first, and make them available to the offline machine. Please read this discussion for understanding how can this be done: (OpenMRS Talk) Installing Bahmni with Limited Internet |
Step 3: Access the Application
Bahmni should now be running with sample data on the machine. Please refer to the following section to understand the various URLs on which the application is running.
Note:
- If Bahmni is NOT running on the URLs mentioned below, please check the service mentioned below, and start them (starting with MySQL and Postgres DB services first)
- Also check if any firewall is blocking access to the ports (selinux, ip4tables, ip6tables)
| Application | URL | Credentials (v0.91) | Credentials (v0.92) |
|---|
| Bahmni EMR UI | http://<machine-ip>/home | superman/Admin123 | superman/Admin123 |
| Bahmni Lab (OpenELIS) | http://<machine-ip>/openelis | admin/adminADMIN! | admin/adminADMIN! |
| Bahmni ERP (OpenERP/Odoo) | http://<machine-ip>:8069 | admin/password | admin/admin |
| OpenMRS | http://<machine-ip>/openmrs | superman/Admin123 | superman/Admin123 |
| Radiology (Dcm4Chee) | http://<machine-ip>/dcm4chee-web3 | admin/admin | admin/admin |
Reports | Accessible from Reports button in EMR UI Dashboard | Bahmni Event Log Service | http://<machine-ip>/event-log-service | tar.gz -P /home/bahmni
# Extract tar file
cd /home/bahmni
tar -xvf Click-7.0.tar.gz
# Install Click 7.0
cd Click-7.0
python setup.py install
# Install the bahmni command line program (Choose the version you want).
yum install https://repo.mybahmni.org/releases/bahmni-installer-0.90-308.noarch.rpm #version 0.90
# Confirm that the bahmni command is correctly installed (you should see a help message for the command)
bahmni --help
# Now setup a configuration file for bahmni command in /etc/bahmni-installer.
curl -L https://goo.gl/R8ekg5 >> /etc/bahmni-installer/setup.yml
# Confirm the contents of the file. It should look like this file: (https://goo.gl/R8ekg5)
cat /etc/bahmni-installer/setup.yml
# Run below command to add mx_download_url to setup.yml file
printf "\nmx_download_url: https://repo.mybahmni.org/releases/mx-1.4.5-1-mdv2012.0.i586.rpm" >> /etc/bahmni-installer/setup.yml
# The above setup.yml, has a timezone entry. You can change it to suit your timezone if you like. For valid options
# please read this document: https://bahmni.atlassian.net/wiki/display/BAH/List+Of+Configurable+Installation+Variables
# Set the inventory file name to local in BAHMNI_INVENTORY environment variable. This way you won't need to use the '-i local' switch every time you use the 'bahmni' command
#You can also configure custom inventory file instead of local.
echo "export BAHMNI_INVENTORY=local" >> ~/.bashrc
source ~/.bashrc
# Now fire the installer
bahmni install
# The installation should be done in about 15 - 30 minutes depending on your internet speed.
# Verify installed components using the command:
yum list installed | grep bahmni |
|
| Expand |
|---|
| title | Installing Bahmni version 0.89 |
|---|
| Steps for Installing Bahmni v0.89 This approach requires you to install the bahmni command line program first. Once "bahmni" command is installed, then you can choose your install settings, and related configurations to perform a specific Bahmni install. For now, we will install Bahmni with default configuration, and a demo database. For Advanced Installation steps, you can refer to this document later. All RPMs are available here. | Code Block |
|---|
# Prerequisite for the fresh installation of Bahmni
yum upgrade python-setuptools

# Install the bahmni command line program.
yum install https://repo.mybahmni.org/releases/bahmni-installer-0.89-193.noarch.rpm  #version 0.89

# Confirm that the bahmni command is correctly installed (you should see a help message for the command)
bahmni --help

# Now setup a configuration file for bahmni command in /etc/bahmni-installer.
curl -L http://tiny.cc/defaultsetup >> /etc/bahmni-installer/setup.yml

# Confirm the contents of the file. It should look like this file: ( http://tiny.cc/defaultsetup )
cat /etc/bahmni-installer/setup.yml

# The above setup.yml, has a timezone entry. You can change it to suit your timezone if you like. For valid options
# please read this document: https://bahmni.atlassian.net/wiki/display/BAH/List+Of+Configurable+Installation+Variables

# Set the inventory file name to local in BAHMNI_INVENTORY environment variable. This way you won't need to use the '-i local' switch every time you use the 'bahmni' command
#You can also configure custom inventory file instead of local.
echo "export BAHMNI_INVENTORY=local" >> ~/.bashrc
source ~/.bashrc

# Now fire the installer
bahmni install

# The installation should be done in about 15 - 30 minutes depending on your internet speed.
# Verify installed components using the command:
yum list installed | grep bahmni
|
|
| Expand |
|---|
| title | Installing Bahmni version 0.88 |
|---|
| Steps for Installing Bahmni v0.88 This approach requires you to install the bahmni command line program first. Once "bahmni" command is installed, then you can choose your install settings, and related configurations to perform a specific Bahmni install. For now, we will install Bahmni with default configuration, and a demo database. For Advanced Installation steps, you can refer to this document later. All RPMs are available here. | Code Block |
|---|
# Prerequisite for the fresh installation of Bahmni
yum upgrade python-setuptools

# Install the bahmni command line program (Choose the version you want).
yum install https://repo.mybahmni.org/releases/bahmni-installer-0.88-101.noarch.rpm  #version 0.88

# Confirm that the bahmni command is correctly installed (you should see a help message for the command)
bahmni --help

# Now setup a configuration file for bahmni command in /etc/bahmni-installer.
curl -L https://goo.gl/R8ekg5 >> /etc/bahmni-installer/setup.yml

# Confirm the contents of the file. It should look like this file: (https://goo.gl/R8ekg5)
cat /etc/bahmni-installer/setup.yml

# The above setup.yml, has a timezone entry. You can change it to suit your timezone if you like. For valid options
# please read this document: https://bahmni.atlassian.net/wiki/display/BAH/List+Of+Configurable+Installation+Variables

# Now fire the installer
bahmni -i local install #instead of local you can use your custom inventory file

# The installation should be done in about 15 - 30 minutes depending on your internet speed.
# Verify installed components using the command:
yum list installed | grep bahmni
|
|
| Expand |
|---|
| title | Installing Bahmni version 0.87 |
|---|
| Steps for Installing Bahmni v0.87 This approach requires you to install the bahmni command line program first. Once "bahmni" command is installed, then you can choose your install settings, and related configurations to perform a specific Bahmni install. For now, we will install Bahmni with default configuration, and a demo database. For Advanced Installation steps, you can refer to this document later. All RPMs are available here. | Code Block |
|---|
# Install the bahmni command line program (Choose the version you want).
yum install https://repo.mybahmni.org/releases/bahmni-installer-0.87-81.noarch.rpm  #version 0.87

# Confirm that the bahmni command is correctly installed (you should see a help message for the command)
bahmni --help

# Now setup a configuration file for bahmni command in /etc/bahmni-installer.
curl -L https://goo.gl/R8ekg5 >> /etc/bahmni-installer/setup.yml

# Confirm the contents of the file. It should look like this file: (https://goo.gl/R8ekg5)
cat /etc/bahmni-installer/setup.yml

# The above setup.yml, has a timezone entry. You can change it to suit your timezone if you like. For valid options
# please read this document: https://bahmni.atlassian.net/wiki/display/BAH/List+Of+Configurable+Installation+Variables

# Now fire the installer
bahmni -i local install #instead of local you can use your custom inventory file

# The installation should be done in about 15 - 30 minutes depending on your internet speed.
# Verify installed components using the command:
yum list installed | grep bahmni
|
|
|
Upgrade Bahmni to Latest Version
If Bahmni is already installed in the server which is a older version and want to upgrade to latest released version please follow the steps mentioned here.
| Expand |
|---|
| title | Bahmni 0.93 Upgrade instructions |
|---|
|
Steps to Upgrade Bahmni to 0.93.2 Version | Code Block |
|---|
# Install the bahmni command line program
yum update https://repo.mybahmni.org/releases/bahmni-installer-0.93-219.noarch.rpm  #version 0.93.2

# Confirm that the bahmni command is correctly installed (you should see a help message for the command)
bahmni --help

# Now fire the installer
bahmni -i local install

# The installation should be done in about 15 - 30 minutes depending on your internet speed.
# Verify installed components using the command:
yum list installed | grep bahmni |
|
| Expand |
|---|
| title | Bahmni 0.92 Upgrade instructions |
|---|
|
Steps to Upgrade Bahmni to 0.92 Version Since Bahmni 0.92 is targeted for CentOS 7.6, you can not just overwrite the previous version which would be running on CentOS 6.x. You would need to provision a new machine with CentOS 7.6 first. However, you can restore your databases, images, docs as before. | Code Block |
|---|
# Install the bahmni command line program
yum install https://repo.mybahmni.org/releases/bahmni-installer-0.92-155.noarch.rpm  #version 0.92

# Confirm that the bahmni command is correctly installed (you should see a help message for the command)
bahmni --help

# Now fire the installer
bahmni -i local install

# The installation should be done in about 15 - 30 minutes depending on your internet speed.
# Verify installed components using the command:
yum list installed | grep bahmni |
|
| Expand |
|---|
| title | Bahmni 0.91 Upgrade instructions |
|---|
|
Steps to Upgrade Bahmni to 0.91 Version The below commands will upgrade Bahmni to 0.91 version. But this will override the existing inventory file. Please check the inventory (local) file before running install command. | Code Block |
|---|
# Install the bahmni command line program
yum update https://repo.mybahmni.org/releases/bahmni-installer-0.91-89.noarch.rpm  #version 0.91

# Confirm that the bahmni command is correctly installed (you should see a help message for the command)
bahmni --help

# Now fire the installer
bahmni -i local install

# The installation should be done in about 15 - 30 minutes depending on your internet speed.
# Verify installed components using the command:
yum list installed | grep bahmni |
|
| Tip |
|---|
| title | Limited Internet Installation |
|---|
|
If you wish to install Bahmni on a machine that does NOT have internet access, then you will need to download all the necessary RPMs first, and make them available to the offline machine. Please read this discussion for understanding how can this be done: (OpenMRS Talk) Installing Bahmni with Limited Internet |
Step 3: Access the Application
Bahmni should now be running with sample data on the machine. Please refer to the following section to understand the various URLs on which the application is running.
Note:
- If Bahmni is NOT running on the URLs mentioned below, please check the service mentioned below, and start them (starting with MySQL and Postgres DB services first)
- Also check if any firewall is blocking access to the ports (selinux, ip4tables, ip6tables)
| Application | URL | Credentials (v0.91) | Credentials (v0.92) |
|---|
| Bahmni EMR UI | http://<machine-ip>/home | superman/Admin123 | superman/Admin123 |
| Bahmni Lab (OpenELIS) | http://<machine-ip>/openelis | admin/adminADMIN! | admin/adminADMIN! |
| Bahmni ERP (OpenERP/Odoo) | http://<machine-ip>:8069 | admin/password | admin/admin |
| OpenMRS | http://<machine-ip>/openmrs | superman/Admin123 | superman/Admin123 |
| Radiology (Dcm4Chee) | http://<machine-ip>/dcm4chee-web3 | admin/admin | admin/admin |
| Reports | Accessible from Reports button in EMR UI Dashboard |
|
|
| Bahmni Event Log Service | http://<machine-ip>/event-log-service |
|
|
Bahmni Services
The following are the various services on your machine, related to Bahmni:
| Code Block |
|---|
# command to list all services
sudo service --status-all

# command to list all configured services
chkconfig --list

# Command to start or stop a service is: service <service-name> start | stop | status | restart
# -----------------------------------------------------------------------------------------------

# Check status of Apache httpd service (runs Bahmni EMR UI)
sudo service httpd status

# Check status of OpenMRS Backend (needed for Bahmni EMR UI to talk to OpenMRS)
sudo service openmrs status

# Check status of Reports (needed to see reports inside EMR UI)
sudo service bahmni-reports status

# Check status of OpenELIS / Bahmni-Lab
sudo service bahmni-lab status

# Check status of Odoo (For Bahmni version 0.92 and above)
sudo service odoo status

# Check status of OpenERP (For Bahmni version 0.91 and earlier)
sudo service openerp status

# Check status of Bahmni and ERP Connector (for data sync between systems)
sudo service bahmni-erp-connect status

# Check the status of atomfeed-console Service (Looking at the failed events and retrying failed events)
sudo service atomfeed-console status

# Databases needed to be running (mysqld for Bahmni EMR / OpenMRS, and Postgres for Lab and ERP)
sudo service mysqld status

# Check status of postgres (For Bahmni version 0.92 and above)
sudo service postgresql-9.6 status

# Check status of postgres (For Bahmni version 0.91 and earlier)
sudo service postgresql-9.2 status
|
| Code Block |
|---|
| title | Service start commands for Bahmni |
|---|
|
# Start all services
sudo service mysqld start
sudo service postgresql-9.6 start
sudo service openmrs start
sudo service httpd start
sudo service bahmni-reports start
sudo service bahmni-lab start
sudo service odoo start
sudo service bahmni-erp-connect start
sudo service atomfeed-console start
sudo service pacs-integration start
|
Navigating the File System
Post install, the various sub-systems are installed and accessible in the following locations:
| Code Block |
|---|
| title | Application Install Locations |
|---|
|
# All applications are installed in /opt
cd /opt

# Location for Bahmni EMR UI and config (app deployed in Apache httpd server)
cd /var/www

# Location for OpenMRS (contains embedded tomcat)
cd /opt/openmrs

# Location for OpenMRS modules
cd /opt/openmrs/modules

# Location for Bahmni lab / OpenELIS (contains embedded tomcat)
cd /opt/bahmni-lab

# Location for Bahmni ERP / OpenERP
cd /opt/bahmni-erp

# Location for Bahmni reports (accessed from EMR UI Reports Button on Home Screen)
cd /opt/bahmni-reports

# Location for Bahmni pacs-integration service
cd /opt/pacs-integration |
| Code Block |
|---|
|
# Most Bahmni related Log files are located in /var/log in respective sub-folders bahmni-lab, openmrs, etc.
# These are all soft links into /opt/app-name/log folder.
cd /var/log

# Client side logs (javascript errors) -- uses StackTrace.js library
cd /var/log/client-side-logs

# pgsql logs (Bahmni 0.92 and above)
cd /var/lib/pgsql/9.6/data/pg_log/

# pgsql logs (Bahmni 0.91 and earlier)
cd /var/lib/pgsql/9.2/data/pg_log/

# mySQL log file /var/log/mysqld.log

# DCM4CHEE log file /var/lib/bahmni/dcm4chee-2.18.1-psql/server/default/log/server.log |
Figuring out which RPM versions of Bahmni are installed
| Code Block |
|---|
yum list installed | grep bahmni |
This is a sample output of the command:
| Code Block |
|---|
|
[root@localhost vagrant]# yum list installed | grep bahmni
atomfeed-console.noarch               1.1-1                      @bahmni
bahmni-appointments-frontend.noarch   0.93-31                    @bahmni
bahmni-emr.noarch                     0.93-131                   @bahmni
bahmni-erp.noarch                     0.93-76                    @bahmni
bahmni-erp-connect.noarch             0.93-76                    @bahmni
bahmni-implementer-interface.noarch   0.93-97                    @bahmni
bahmni-installer.noarch               0.93-197                   installed
bahmni-lab.noarch                     0.93-58                    @bahmni
bahmni-lab-connect.noarch             0.93-131                   @bahmni
bahmni-reports.noarch                 0.93-45                    @bahmni
bahmni-web.noarch 0.93-131 @bahmni |
Installing dcm4chee & pacs-integration server for Radiology
| Expand |
|---|
| title | Click here to expand for Dcm4chee and PACS... |
|---|
|
Bahmni supports Radiology features that will allow you to view X-Rays and other DICOM images within Bahmni, including the ability to place such orders and make them automatically reach the machine (modality). For making this work, one needs to install dcm4chee (an open source PACS/DICOM server) and bahmni pacs-integration service (that acts as a bridge between Bahmni & dcm4chee). To install these two components perform the following steps: Bahmni uses Ansible under-the-hood to install components on the Linux server. To enable installation of these two components, edit the local (default) inventory file and add localhost under the following sections (run command as root since this file is owned by root): | Code Block |
|---|
> vi /etc/bahmni-installer/local

# Add "localhost" under the following sections like this:
[pacs-integration]
localhost

[pacs-integration-db]
localhost

[dcm4chee]
localhost

[dcm4chee-db]
localhost
|
- Now re-run the bahmni install command: "bahmni install" from command line. This will re-trigger bahmni installation, and Ansible will re-check all configurations, ignore most of them (since they are already installed) and will ONLY install the relevant rpms needed for pacs-integration and dcm4chee (including postgres database).
- After the installer has finished running, you should be able to open and see dcm4chee running on url: https://192.168.33.10/dcm4chee-web3/ (Creds: admin/admin).
- Once you have done the above 3 steps and all looks good, you need to perform some additional steps (like configuring Database and setting up an actual machine (or modality) or a Test modality). For that please read this documentation: Radiology and PACS Integration
|
Securing & Protecting the Bahmni Server
| Warning |
|---|
It is very important to take your server security seriously. Please ensure you setup adequate security controls for your Bahmni server, including firewalls, strong passwords, key based ssh access, https certificates, etc. PLEASE READ THIS DOCUMENT: Securing and Protecting the Bahmni Server |