Purpose and Benefits
The Order Tab allows the user to create new Laboratory Test and Radiology Orders for the patient. There are two parts of the Order system:
- One is the part of the application from where the providers will be placing the order.
- The second is the part from where the orders will be fulfilled.
The screenshot below displays an instance of the Order Placement tab:
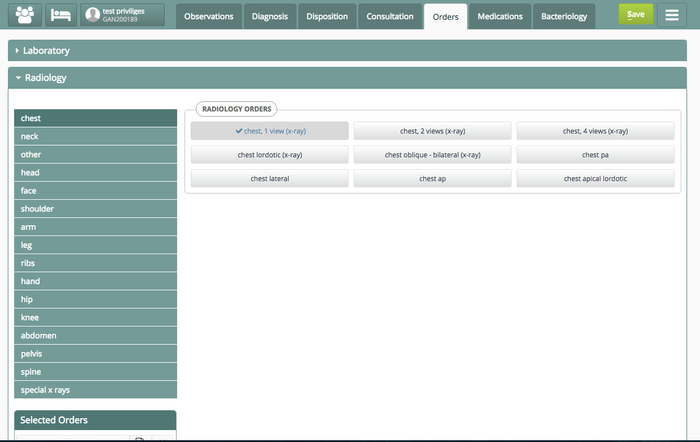
Order Placement tab
Steps
Configure the Orders Placement Tab
| Code Block | ||||
|---|---|---|---|---|
| ||||
// In config-> bahmni_config/clinical/extension.json

"bahmniClinicalConsultationOrders": {
    "id": "bahmni.clinical.consultation.orders",
    "extensionPointId": "org.bahmni.clinical.consultation.board",
    "type": "link",
    "label": "Orders",
    "title":"Orders",
    "url": "orders",
    "icon": "fa-user-md",
    "order": 6,
    "requiredPrivilege": "app:clinical:observationsTab"
} |
Follow the steps in Master Data Setup for Order Tab for setting each Order Type Section(Ex: Lab Orders, Radiology Order) on the Orders Tab.
Configure Orders Module on the Bahmni Home page
| Code Block | ||||
|---|---|---|---|---|
| ||||
// In config-> bahmni_config/home/extension.json

"orders": {
 "id": "bahmni.orders",
 "extensionPointId": "org.bahmni.home.dashboard",
 "type": "link",
 "label": "Orders",
 "url": "../orders/#/search",
 "icon": "fa-book",
 "order": 10,
 "requiredPrivilege": "app:orders"
} |
Configure Orders Module patient list queues for Fulfillment
| Code Block | ||||
|---|---|---|---|---|
| ||||
//For configuring patient  list queues with tabs as order type use the following config in extension.json under Orders folder.

"bahmni_clinical_patients_search_radiologyorderallpatients": {
    "id": "bahmni.clinical.patients.search.RadiologyOrderAllPatients",
    "extensionPointId": "org.bahmni.patient.search",
    "type": "config",
    "extensionParams": {
       "searchHandler": "emrapi.sqlSearch.activePatients",
       "display": "Radiology Orders",
       "forwardUrl": "../orders/#/patient/{{patientUuid}}/fulfillment/Radiology Order",
       "forwardButtonTitle": "View",
       "view": "tabular"
    },
    "label": "Radiology Order",
    "order": 1,
    "requiredPrivilege": "app:orders"
} |
Configure an Observation Template to Fulfill the Order
- First add the root concept set with the following format Format : Order Type + " Fulfillment Form "
- Then add the concepts that have to appear in the fulfillment form. They have to be configured under that particular root concept set.
- For example, for a Radiology Order, the root concept set should be " Radiology Order Fulfillment Form " where "Radiology Order " is the order type in order_type OpenMRS table. DocumentUpload concept can be configured under Root Concept "xxx Fulfillment Form" to upload the XRays and a Notes Concept to add Radiologist comments.
Configure Urgency and NeedPrint buttons for Radiology and Lab Orders:
- Urgency Information
Urgency button is to indicate that the x-rays/lab test has to be taken for that orders immediately.- Radiology Orders: This urgency information is sent as part of HL7 message to PACS machine. So that urgent orders are prioritised and shown in first place in the PACS machine that is integrated.
- Lab Orders: From 0.90 we are introducing the Urgent button to indicate Lab orders that are "STAT" or that needs to be done on priority. This information is currently captured in the OpenMRS db. It's not synced to openELIS.
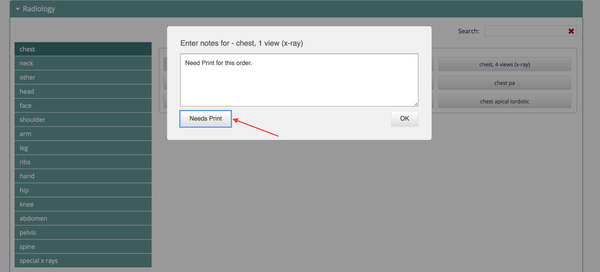
- NeedPrint Button
Need Print button automatically puts the text in notes saying 'Need Print for this Order' by reducing the burden to type it.
For internalization of button text Needs Print and and text Needs Print for this order , use below keys. Follow this page to know about Internationalization Support in bahmni.
The keys below are placed in clinical/locale_en.json to show the text in english language.
| Code Block | ||||
|---|---|---|---|---|
| ||||
"CLINICAL_ORDER_RADIOLOGY_NEED_PRINT": "Need Print for this order.", "CLINICAL_ORDER_RADIOLOGY_NEED_PRINT_BUTTON": "Needs Print" |
Configuration
To configure the above buttons for Radiology Orders ’enableRadiologyOrderOptions' and for Lab Orders ‘enableLabOrderOptions’ to be added in the clinical/app.json. The functionality is enabled based on the options selected and options are case-insensitive
| Info |
|---|
The config for Lab orders is available from the patch Version of 0.90. |
| Code Block | ||||
|---|---|---|---|---|
| ||||
{ config:{
		"enableRadiologyOrderOptions":["NeedsPrint","Urgent"],
		"enableLabOrderOptions":["NeedsPrint","Urgent"]
	}
} |
| Info | ||
|---|---|---|
Above configuration for Radiology is applicable from 0.88 release version of Bahmni. To configure the above button on 0.87 release version of Bahmni, add 'enablePACSOptions' to clinical/app.json.
|
Master Data Setup for Order Tab
To set up a new order type, one needs to add the order type in the OpenMRS database. This can be done by running the SQL query given below. Refer order_type table in the OpenMRS database with Lab Order, Radiology Order already configured in Bahmni.
Code Block language js linenumbers true insert into order_type (name, description, creator, date_created, retired, uuid, java_class_name) values('OrderTypeName', 'Description', SpecifyUserIdOfCreator, now(), 0, uuid(), 'org.openmrs.Order');Every Order Type in Bahmni is associated with a Concept Set (e.g.: Lab Orders/Samples or Radiology Orders/BodyParts) in OpenMRS. This acts as a starting point in navigation of tests during Order Creation. For the newly setup Order Type, we need to create a corresponding Concept Set and associate it as a child of "All Orderables" concept set already available in Bahmni.
Code Block language js linenumbers true The Concept Set Structure looks like below All Orderables -Lab Samples/Orders --Blood ---ESR ---MCH ---Haemoglobin --Serum --RBS --Creatinine -Radiology Orders/BodyParts --Head ---Skull AP ---Skull PA --Chest ---Chest AP ---Chest PA
- The Concept Set that is defined in Step 2 is a Two Level Set.
- Level 1 shows up the Left Navigation Bar.
- Level 2 contains the tests that needs to be shown up on the right section of UI.
- The doctor can select the provided tests. The grouping of the Tests happens using "Concept Class". Lets say, if Blood contains both Anaemia Panel (Concept Class as Panel) and "Haemoglobin" (Concept Class as Test), then the grouping of the tests in the UI happens based on Panel and Test.
To save a test of particular ConceptClass as an Order, we need to map the ConceptClass to OrderType in the OpenMRS database table order_type_class_map.
Code Block language js linenumbers true insert into order_type_class_map (order_type_id, concept_class_id) values(<order type id>, <concept class id>);
Master Data Setup for Lab Data
Please refer to the Configure Lab Data page for details.
Master Data Setup for Medication Data
Please refer to the Configure Medication Data page for details.
| Tip | |
|---|---|
On This Page:
|
| Panel | ||||||
|---|---|---|---|---|---|---|
| ||||||