Purpose
Bahmni uses the Address Hierarchy module of OpenMRS to keep a list of address entries. Follow steps below to configure a new address hierarchy for your implementation.
This step is not mandatory.
Steps
1) Upload CSV with address mappings
Address Hierarchy needs to be configured in OpenMRS for it to be displayed in the Bahmni UI. It is best set up by uploading a Comma Separated Values (CSV) file with the desired address hierarchy. For e.g., if a hierarchy is defined as State -> District -> Taluka / Block -> Village / City then the CSV should have the format of State, District, Taluka , Village
Note that the CSV columns should be in the order of Bigger Geographical region to Smaller region. Otherwise the address fields would appear in reverse order on the Registration page and auto-complete will not be useful.
Example
For example, refer below. Also refer to attached address_hierarchy.csv
| Hierarchy | State | District | Taluka | Village |
| Incorrect | Maharashtra | Ghot | Chamorshi | Gadchiroli |
| Correct | Maharashtra | Gadchiroli | Chamorshi | Chamorshi |
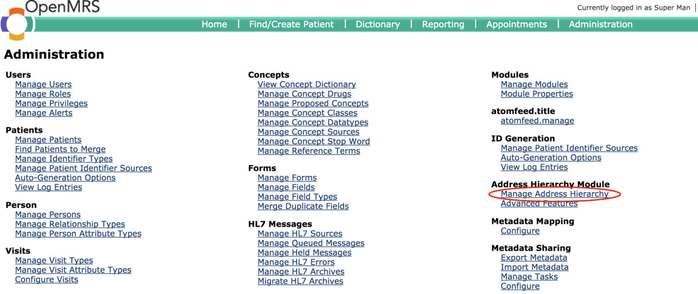
After creating such a CSV, visit OpenMRS > Administration > Manage Address Hierarchy page to upload it.
In the "Upload Address Hierarchy" section:

Settings for the Screenshot above:
- Select the CSV file to upload
- Delimiter (regex format): ',' (without quotes)
- User-Generated Id Delimiter (regex format): leave as blank
- Overwrite Existing Hierarchy: If there is an existing address hierarchy that needs to be replaced, then it should be marked as "checked". If this is left "unchecked" then new addresses will get appended to the existing hierarchy.
- Click Upload
2) Map Address Fields
Once the Address CSV is successfully uploaded, a list of fields will be visible in the Address Hierarchy Levels as shown below:

Settings for the Screenshot above:
- Click on the Edit link next to the field to specify the Name, Address Field" and Required flag.
- Name: is what would be the Label displayed to the user on Registration Page.
- Address Field: is stored in the "person_address" table. From DB perspective this does not matter but keeping these closest to relevant fields is a good practice.
Once this is done for all fields, the address hierarchy setup is complete.