Setting up Bahmni Dev Environment
- Gurpreet Luthra
- Apoorva Rawat
- Himabindu Akkinepalli
DRAFT PAGE
This document is in progress. We will remove this warning note once it is complete.
This document will help people setup their machine so that one can perform development on Bahmni.
This document was written for Mac OS X, but should be equivalent on Linux. Will need slightly different commands for Windows, but essentially the steps will be same.
Background
- The Bahmni EMR is a client-side application, built in AngularJS and HTML, and it interacts with the OpenMRS back end using REST web services.
- Bahmni also includes a regular OpenMRS module called bahmni-core that provides additional server-side functionality.
- Bahmni team has forked OpenELIS for Lab Test Workflow, and reporting. And the team has written modules for OpenERP (Odoo) for Inventory and Billing.
- To integrate all three sub-systems (OpenMRS, OpenERP and OpenELIS) the team wrote an ATOM Feed based integration module, that allows data to flow across the three sub-systems.
- You can refer to Bahmni Architecture here: Architecture
Dependencies to Install
Please ensure that the following dependencies are installed on your machine.
Ruby v2.1 (or above) - Needed by Compass to compile the SCSS files.
First Time Setup
Virtual box setup
First ensure that Bahmni Virtual Box (and Vagrant) are already installed and running on your machine. Follow steps mentioned here: Bahmni Virtual Box. Once you have vagrant box setup, then Bahmni will be running inside the vagrant box, but accessible from your host machine's browser using the URL https://192.168.33.10/home. Also, your code folder will be shared and editable from both the guest machine, and the host machine. This means, that you can now use your favourite IDE on your host machine to edit code, and compile and then you can run the changes from inside the Vagrant box.
Note that these steps are needed ONLY IF you are going to modify EMR UI code, and do development. If you only want to perform implementation specific changes, like changes to registration screen, create observation forms/templates, add fields to screen, etc, then you DO NOT need to setup the Development Environment. In that case, you only need to work with the implementation-config folder specific to your implementation, and modify only files inside that folder to see changes in the UI.
The files that you modify, should be then copied in /var/www/bahmni_config. Or you can alternatively, create a softlink where /var/www/bahmni_config points to your implementation-config folder.
Install Bower, Grunt and Compass
npm install -g bower
npm install -g grunt-cli
gem install compass         # you may need to use sudo to install Ruby gem compass ...
Clone the code
Clone bahmni code in the same folder where you have bahmni-environment sub-folder. Each clone command creates a sub-folder with the repository name.
cd /Projects/bahmni
# clone the default configuration (some folks may choose their project specific config like jss-config)
git clone https://github.com/Bhamni/default-config.git
# clone Bahmni EMR UI project
git clone https://github.com/Bhamni/openmrs-module-bahmniapps.git
# clone the Bahmni Core backend project
git clone https://github.com/Bhamni/bahmni-core.git
# clone the common java utils used across the project
git clone https://github.com/Bhamni/bahmni-java-utils.git
Prepare and Build Bahmni EMR UI
The following commands will build the Bahmni EMR UI application. Make sure npm, bower and grunt-cli have been installed on your machine as mentioned on top of this document.
# Go into the UI directory
cd openmrs-module-bahmniapps/ui


# Install node dependencies (Installed into node_modules).
npm install
# Set up UI component/dependencies (This installs all the UI dependencies into app/components)
bower install
# Build the application (into dist folder) using Grunt
grunt
Sample build log
You can see how a sample build output will look here on TravisCI Build Logs for Bahmni EMR UI
Create Links to your Host Machine Folders for EMR UI
Now link your host machine compiled code with vagrant filesystem, so that Apache running inside vagrant picks up your compiled code (basically softlinks are created inside vagrant)
When you link the folders, the script below will delete the current UI code from the Virtual Box. If you mess up the Virtual box, and need to reset it, just do a vagrant destroy and a vagrant up to restore it back. Of course, any changes you made inside the Virtual Box will get lost.
# Go back into the openmrs-module-bahmniapps folder (not ui folder)
cd openmrs-module-bahmniapps

# WARNING DO THIS ONLY IF YOU HAVE COMPILED THE UI CODE ALREADY ON YOUR MACHINE. ELSE YOUR EMR UI WON'T WORK
# IF YOU ARE ONLY DOING IMPLEMENTATION SPECIFIC UI CHANGES, THEN READ THE WARNING NOTE ABOVE.

# links app folder
./scripts/vagrant-link.sh
# links dist folder
./scripts/vagrant-link.sh dist
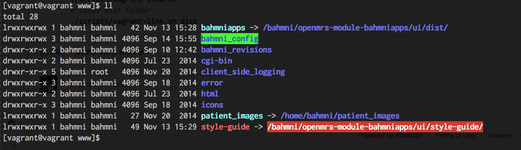
You will notice that after executing the above link commands, new soft links will get created in /var/www inside your vagrant box, linking to your machine.
BEFORE:
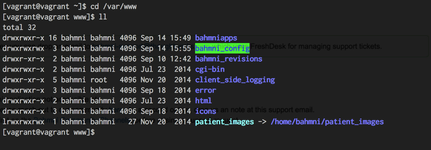
AFTER:
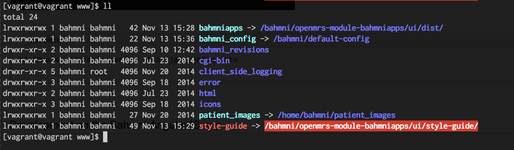
cd /Project/default-config  # or jss-config, etc

# Link the configuration
./scripts/vagrant-link.sh
CONFIG LINKED:
If you destroy your vagrant, and perform a vagrant up again, then these soft links will also be removed and you will need to run the link commands again.
Development on the Bahmni AngularJS app
You have checked out the Bahmni application code (remember, it’s a client-side AngularJS application) on your local machine at
/Projects/bahmni/openmrs-module-bahmniapps/ui/.
You may use whatever development tools you prefer, for editing html + js + css. If you are going to be working on both client-side and server-side code, you’ll probably want to use a Java IDE like IntelliJ or Eclipse. But if you’re purely working on the client-side app you can use something more web-focused.
Editing HTML files
You can directly edit HTML files and see the changes.
Editing JS files
You can directly edit javascript files and see the changes.
Editing CSS files
In Bahmni, CSS is written using SASS, and therefore after you edit a .scss file you need to compile everything by going to openmrs-module-bahmniapps/ui and running:
grunt
For example, edit the file /Project/bahmni/openmrs-module-bahmniapps/ui/app/styles/bahmni-helper/_base.scss by changing the color of the body element from $text to #ff0000, then build with grunt.
Developing OpenMRS Java modules
All OpenMRS modules that Bahmni uses (as third party modules), or those created by Bahmni team themselves, are stored in either: /home/bahmni/.OpenMRS/modules (old location) or in /opt/openmrs/modules (new location) folder. Check your vagrant box to see the current location. If you want to change or add a new OpenMRS/Bahmni module, you should perform the following steps.
If you have a new vagrant box (from atlas), then tomcat service may not exist. Instead the service name will be openmrs.
# Stop Tomcat
sudo service tomcat stop

# Copy the module
cp module_name.omod /home/bahmni/.OpenMRS/modules

# Start Tomcat
sudo service tomcat start
# Go to the appropriate project directory
cd bahmni-core

# Build the module using maven
mvn clean install
Debugging Code Running in Tomcat
To debug code running in tomcat, you need to start tomcat in debug mode, so that it opens a port for you to connect your IDE to it (via Remote Debugger). You will need to do the following:
# Inside your vagrant, stop tomcat
vagrant ssh
sudo su bahmni
sudo service tomcat stop

# Start tomcat in debug mode
cd /home/bahmni/apache-tomcat/bin
sh catalina.sh jpda start

#In the log file you should see the debug port is opened 8000
cd /home/bahmni/apache-tomcat/logs
cat catalina.out | grep 8000
# Output: Listening for transport dt_socket at address: 8000
After that you will need to connect the port 8000 of your guest and host, by editing the VagrantFile
# Add this line in your Vagrantfile
config.vm.network :forwarded_port, guest: 8000 host: 8000
Now you can open the Remote Debugger in Eclipse/IntelliJ (or any IDE), and connect to port 8000 to debug your code.
The Bahmni documentation is licensed under Creative Commons Attribution-ShareAlike 4.0 International (CC BY-SA 4.0)