Odoo 10 System Configuration
- Angshuman Sarkar
- Mohankumar Thangavel
Disable auto-update of modules
During startup, Odoo will automatically try to update a module. Disable this feature by editing odoo startup file.
- Edit “/etc/init.d/odoo” and remove the line “update --all"
- You might have to restart the “systemctl daemon”. See below
Reloading SystemCtl daemon
When you change the startup script (/etc/init.d/odoo), when you want to restart the service, it may throw up warning like:
Restarting odoo (via systemctl): Warning: odoo.service changed on disk. Run 'systemctl daemon-reload' to reload units.
To resolve this, you need to do the following
> systemctl daemon-reload

> service odoo restart
Enable Excel file import / export
If you plan to use excel files for import/export, then you need to install additional python module (xlrd package). otherwise, you can use CSV import/export as well. To install the xlrd package, from system command line (ensure you have sudo access, otherwise it will throw permission denied error).
> sudo pip install xlrd
Installing add-on Apps or Modules
In Odoo, you may install add-on apps or modules from Odoo website, app store etc. Apps may be free and paid or differently licensed. There are 2 primary ways to add a module or app.
- Apps search: Within application go to "Menu / Apps" - you can search for apps there.
- Website search: Go to Odoo website, or search third party modules page. 'Web Preview' module installation described below how such moduels are installed.
Install module - Web Preview
Odoo package does not come bundled with a “print preview”. For this you need to install the “web preview” module.
Download web preview module https://apps.odoo.com/apps/modules/10.0/web_pdf_preview/ - this would probably be a zip, unzip the file
> cd /tmp/
> curl -O https://apps.odoo.com/loempia/download/web_pdf_preview/10.0.1.0/7AneDZYF8pkyCdATRtcYdc.zip
> unzip 7AneDZYF8pkyCdATRtcYdc.zip
NOTE: You should find out whats the actual URL of the addon module (and not just copy paste from above)
Copy the unzipped directory "web_pdf_preview" to location /opt/bahmni-erp/bahmni-addons/
> cp -R web_pdf_preview /opt/bahmni-erp/bahmni-addons/
Change permissions to user odoo
> chown -R odoo:odoo /opt/bahmni-erp/bahmni-addons/web_pdf_preview
- Now log back onto Odoo and "Activate the developer mode" from "menu / settings".
- From "Menu / Apps", click on "Update Apps List" on left menu.
- Once the apps list is refreshed, clear the filter "apps" in the search field above, and search for "web pdf"
- From the displayed list, identify the "Web PDF report and preview .. ", click install.
- Try to take print. E.g. Go to “Accounting/Chart of Accounts”, select an account and click the print option.
General Settings
- Go to "Menu / Settings / General Settings". Set appropriate settings like “Allow multiple Currencies”, “Allow users to import data from CSV/XLS/XLSX/ODS files” etc
- Optionally, you may setup email configurations for outgoing email server, incoming email gateway.
Company Information
You will need to setup the Organization info for whom Bahmni is being implemented. To do this, you need to setup company/address/users. Not all the options would be available with default login, and you should "Activate the developer mode" from "menu / settings" as described earlier.
- Go to "Menu / Settings" and click on "Companies" link on the left menu. There would be already a company "My Company" listed there. Select and click "Edit".
- Change the Company Name, Address, Email, Phone etc.
- You must specify the Country in address for the Company.
- Change the company currency. If you do not find the currency listed in the company info page, you might have to active the currency first.
Address Localization
During creation of a customer (on sync of patients from OpenMRS), the customer addresses are also populated. While doing this, Bahmni tries to best lookup and set the address hierarchy. Few things you should know:
- Odoo default already has list of countries. Bahmni Odoo integration supports only 1 country.
- For the listed countries, Odoo may or may not have the country states/provinces imported. This can also depend on what “localization module” you choose to import. You should check whether the “states” are already available in Odoo.
- To check, go to "Menu / Sales / Configuration / Contacts / Localization / Countries", search for Country (e.g. India) and select that country.
- It should show the States/Provinces of the country, along with other details like Currency, code etc.
- You may choose to import States/Provinces, Districts/County, Tehsil/Level3 from a CSV/Excel as well.
- If Odoo already has the States populated for the country, your state/province list in OpenMRS should match those existent on Odoo. Note, the matching is done by Names only.
- While syncing patients, the address levels are matched by name - so the names must be same between Odoo and OpenMRS.
- Each Country State in Odoo has a “code” which is like a short code or abbreviations. e.g. Indian State of Karnataka has a short code “KA”, or USA California has “CA” etc. This is a mandatory field. If you are uploading State list in Odoo, you need to enter unique short code for the states for a country.
- If you do not want to setup the “state/province” lists in Odoo, and instead want Bahmni to create the “States” automatically, there is an configuration element which you can enable (or disable)
- Go to “Menu / Sales / Settings”, enable “Automatically create customer address for state, district, level3” under (this is by default set to true)
- This configuration applies for 3 levels - state/province, district/county, level3/tehsil etc. You may upload the list of these levels in Odoo (ensuring they are same as those in OpenMRS)
- If you “disable” the above configuration option, the sync will try to locate the address levels and use if any found, but will not create if not present.
Users
You should create representative user for your system. You can do that through “Menu / Settings / Users”. While defining user, enable required “access rights” and “technical settings”.
Note: to see all options, including the technical settings, you need to enable “developer mode” first.
For example: you may create a user “Ramesh” as below
- Name: Ramesh
- Email Address: ramesh_n (NOTE: this is login username, and needn’t be email address)
- You probably should set an email for user name, if you want Odoo to send mails and updates.
- Access Rights: select what applies
- Sales: Manager
- Inventory: User
- Accounting & Finance: Billing
- Purchases: User
- Employees: Employee
- Point of Sale: User
- Technical Settings: select what applies, for example
- Skip Invoice Options: check this option if you want the user to skip different invoice options (and if the default invoicing option is applicable for that user). See Sales/Invoicing Configuration for more info.
- NOTE: Manage Product Packaging: Enable this option only if you want to specify product packaging, during sales. This will show a dialog box to enter products during quotation for sale line entry.
- For inline-editing of sale order item in quotation (Default), disable "Manage Product Packaging" from the users settings. If you should enable “Manage Product Packaging” privilege for the user, then you should grant him/her “Manage Packages” privilege as well.
System Parameters
Go to "Menu / Settings / Technical / Parameters / System Parameter". Note, you may need to activate developer mode to edit system parameters.
Sync Patient Attributes
You can specify what patient attributes you would like to sync as customer attributes in Odoo. What attributes are to be synced are driven by configuration. To do this, in system parameters list, you need to edit the parameter “openmrs_patient_attributes”.
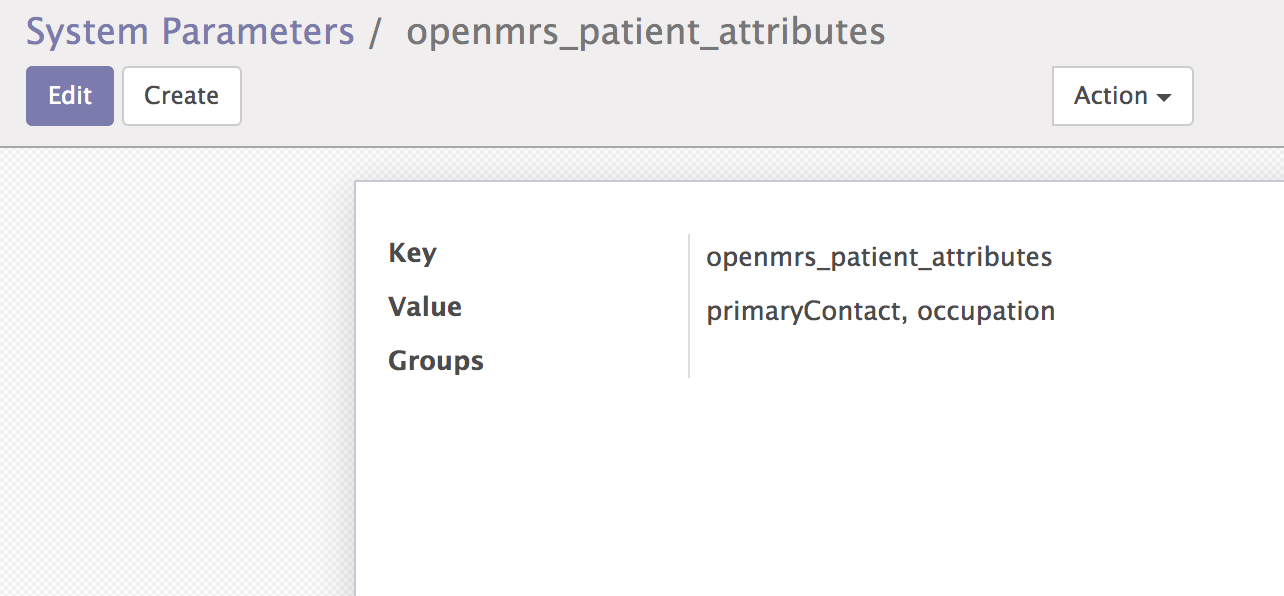
Here you can define the attributes which we wanted to sync. Note,
- Attribute names must be comma separated. For example - “primaryContact, occupation” etc.
- The attribute name must match those defined as OpenMRS person attribute type. The name must be exactly the same of person attribute. For example: “ContactNo” would be the name of the attribute, which might be displayed in Registration screen as “Contact Number”. You should mention the actual “person attribute name”. To find out the person attribute names
- Goto https://<your server>/openmrs/admin/index.htm and then click “Manage Person Attribute Type” link.
- Or directly go to https://<your server>/openmrs/admin/person/personAttributeType.list
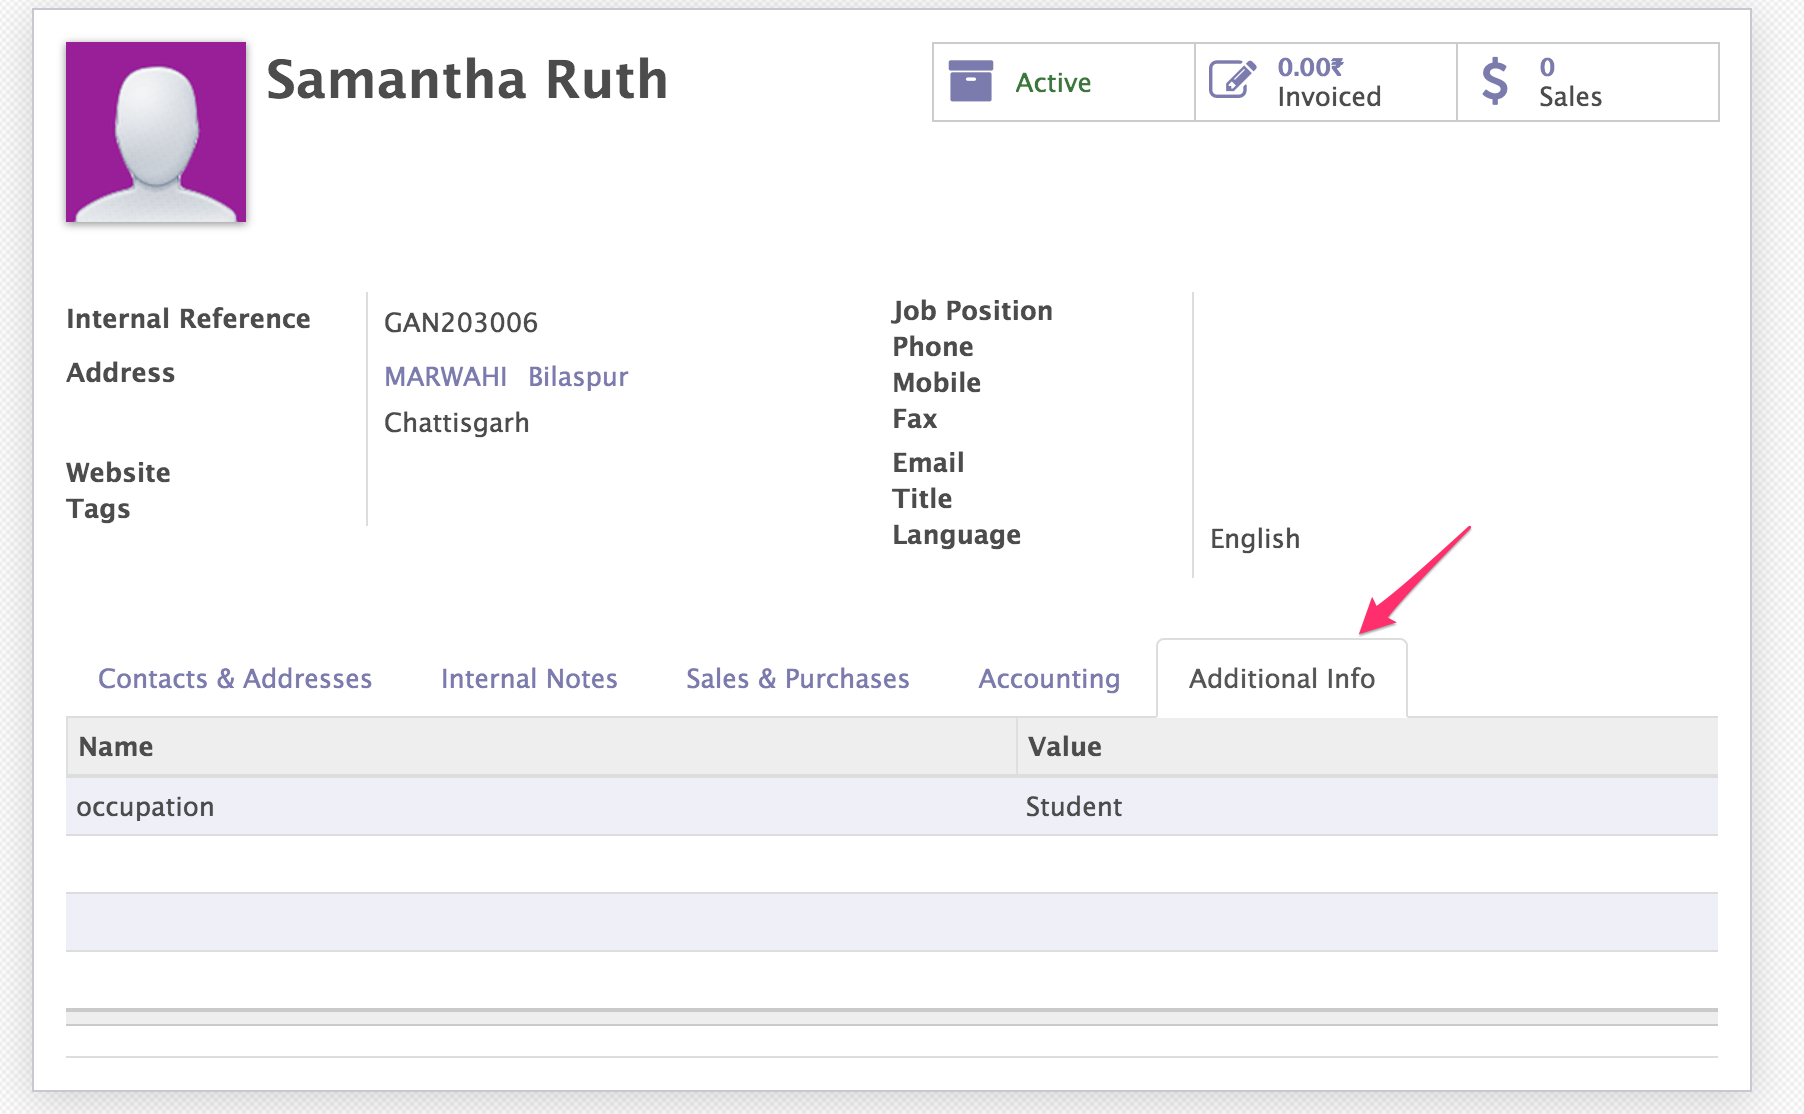
- Captured patient attributes will be synced and displayed in the customer view like below
On this Page
The Bahmni documentation is licensed under Creative Commons Attribution-ShareAlike 4.0 International (CC BY-SA 4.0)