Visit Location
- Hanisha Potturi (Deactivated)
- Sravanthi N. S. CH.
- Angshuman Sarkar
- padmavati
Context
When a patient visits a healthcare facility (or a care provider visits a patient), the information related to where the meetups/consultations happened are captured onto EMR. For example:
- When a patient visits a healthcare facility, a 'Visit' is created for that particular patient corresponding to the Location that represents the facility. Such a location is called 'Visit Location'. e.g a Hospital.
- When the patients goes to departments/sections for consultations/meetups/checkups/investigations, one or more 'Encounters' are created with the specific location that represents the departments/sections. e.g. locations like 'OPD 1', 'Radiology Department', 'Lab' etc. These locations are usually inside a hospital (or a Visit location)
In some cases, there might be multiple 'Visit locations'. Imagine a big hospital which would like to segregate information based on the departments they have or representing more the operational setup they have.
Example:
- A tertiary care might organize their visit locations into departments like 'Cardiology', 'Dental' because the patients visiting these departments probably don't overlap in their services or treatments.
- A hospital which has outreach program centers, like a 'sub center' outside the premises of the main hospital, might want to organize different visit locations because the captive patients for such centers are different or they want to track the patients mainly by the primary service delivery points.
This feature provides ability to have more than one visit open if they are not mapped to same location, so that we can sync visits from different location to the server location.
Functionality
- Visit Location feature allows to create more than one active visit for patient in multiple locations.Previously Bahmni allows to create only one visit for a patient within same visit duration.
- With this feature every visit created will have location associated with it.
Set up Visit Location
With this feature which is available from 0.83v, at least one location should be tagged as Visit Location. Visit Location is a location tag that is introduced.
To see the available locations tags in the system, one has to login to OpenMRS, click on Administration and then on Manage Location Tags. Please refer the image below which shows 3 location tags.

1.Tag Appropriate locations as Visit Location
Follow the below steps to tag a Location as Visit Location
Step 1:
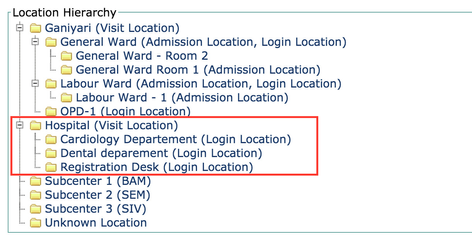
Login to OpenMRS, click on Administration, Manage Locations, which displays the available locations in hierarchy (Refer the image below). Choose the location to tag as visit location from the ways below.

Ways of Tagging
Below are the two ways of tagging locations as Visit Location.
Tag Login Location
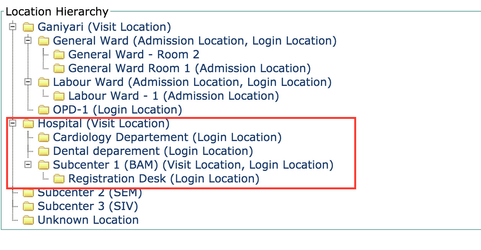
One can choose to tag a location that is already tagged as Login Location as Visit Location also. In this case, this particular location is tagged as both Login and Visit Location.
Example for tagging both login and visit location same time
In the image attached above with the list of available locations and the hierarchy, Subcentre 1 is tagged as Login Location and Visit Location.
Tag Parent Location
One can choose to tag the parent of login location in the hierarchy as Visit Location.
Example for tagging Parent Location as Visit Location
In the image attached above with the list of available locations and the hierarchy, Ganiyari is parent of login location and is also tagged as Visit Location.
Step 2:
Click on the selected location to tag from the two ways of tagging mentioned above.
Step 3:
Choose Visit location by checking the box next to it as shown in the image below.

Step 4:
Click on Save Location
Mapping existing Visits to Location: (From V0.83 onwards)
With this feature, it is mandatory to have a visit mapped to a location.
Please make sure to update older visits created previously are mapped to appropriate location.
Please use the one of the following queries to map the existing visits to a location.
Use the below query when the exact location_id is known and replace visit_location_id with appropriate value
update visit set location_id =<visit_location_id> where location_id is null;
Use the below query when the location name is known and replace location_name with appropriate value
update visit set location_id =(select location_id from location where name='<location_name>') where location_id is null;
2.Update Location information in OpenELIS
Step 1:
Login to OpenMRS. Go to Administration, Manage Locations. Find the appropriate location. In the attached image below, Ganiyari Lab is the chosen location. Copy the uuid of the location.
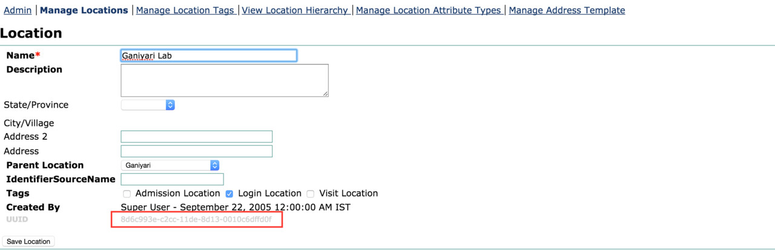
Chosen location should be tagged as visit location (choosing one of the Ways of Tagging). In the above example, Ganiyari which is parent of Ganiyari Lab is tagged as Visit Location.
Step 2:
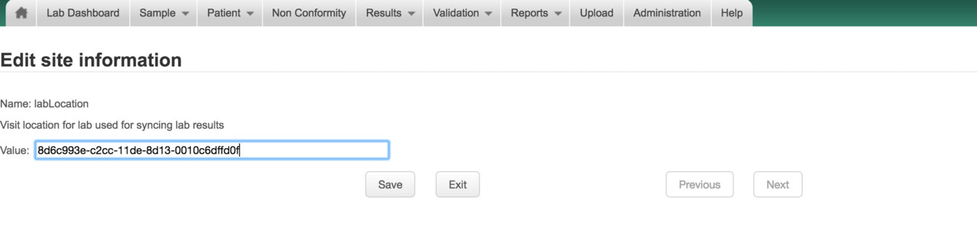
Login to Openelis. Go to Administration, SiteInformation.

Step 3:
Edit the labLocation and fill in the value with valid uuid of location copied from Step 1. Save the information.
Please refer the above image displaying all the site information. Check the box next to lab location and click on edit.
The Bahmni documentation is licensed under Creative Commons Attribution-ShareAlike 4.0 International (CC BY-SA 4.0)