Configure Patient Address
WARNING
This page has been Archived, and is obsolete. It is available on the Bahmni wiki only for reference and historical purposes.
Instead of deleting a page, we prefer to "archive" it, so that it is still available to people who have bookmarked the page.
This page is In-Progress and will be drafted over the next couple of months. If you have any suggestions or would like to add pages which talk about the functionality of Bahmni, please feel free to add them.
Purpose and Benefits
An address hierarchy is maintained in the application to ensure that addresses are codified and human errors can be prevented during entry of patient addresses.
Steps
1) Upload CSV with address mappings:
Address Hierarchy needs to be configured in OpenMRS to display in Bahmni UI. It is best set up by uploading a Comma Separated Values (CSV) file of address hierarchy that represents the hierarchy you want in your implementation. If you have a hierarchy of State > District > Taluka / Block > Village / City then the CSV should have the format of State, District, Taluka , Village.
Note: The CSV columns should be in the order of Bigger Geographical region to Smaller region. Otherwise the address fields would appear in reverse order on the Registration page and auto-complete won't be useful.
e.g. see below, also refer to attached address_hierarchy.csv
| Maharashtra | Gadchiroli | Chamorshi | Ghot |
| Maharashtra | Gadchiroli | Chamorshi | Chamorshi |
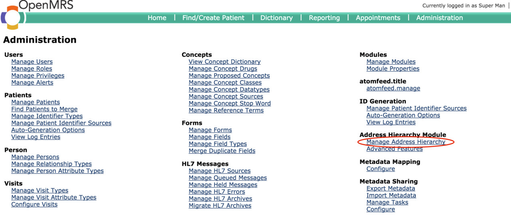
Now, once you have such CSV in place, go to OpenMRS > Administration > Manage Address Hierarchy
In "Upload Address Hierarchy" section, select this CSV file to upload
Set "Delimiter (regex format):" to ',' (without quotes)
Leave "User-Generated Id Delimiter (regex format):" as blank
If you have an existing address hierarchy that you want to replace then mark "Overwrite Existing Hierarchy:" as Checked. This is left "unchecked" then new addresses would get appended to existing hierarchy.
Click upload to complete the upload process.
2) Map Address Fields:
Once the Address CSV is successfully uploaded, you would see a list of fields in the "Address Hierarchy Levels"
Click on the Edit link next to the field to specify the "Name", "Address Field" and "Required" flag.
"Name" is what would be the Label displayed to the user on Registration Page.
"Address Field" is the field in "person_address" table where this field would be stored. From DB perspective this does not matter but keeping these closest to relevant fields is a good practice.
Once this is done for all fields, your address hierarchy set up is complete!
Now Registration page should start showing these fields!!
To ensure that these address fields get synced to correct Labels in OpenELIS, refer to steps in Address Mapping between OpenELIS and Bahmni / OpenMRS
Master Data Setup
Master data for address hierarchy is done by creating a CSV file containing the address mappings to be uploaded. The CSV file's format is as per the sample file provided below :
https://bahmni.atlassian.net/wiki/display/BAH/Address+Hierarchy
Related content
The Bahmni documentation is licensed under Creative Commons Attribution-ShareAlike 4.0 International (CC BY-SA 4.0)


